I hated school.
Learning stuff was hard, and most lessons were boring, so nothing ever really stuck. When I g̶r̶e̶w̶ ̶u̶p̶ got older, I realized that nothing ever changes.
Every instruction manual, recipe book, or online guide is written in the least imaginative way possible, so you forget the information the second you've finished reading it.
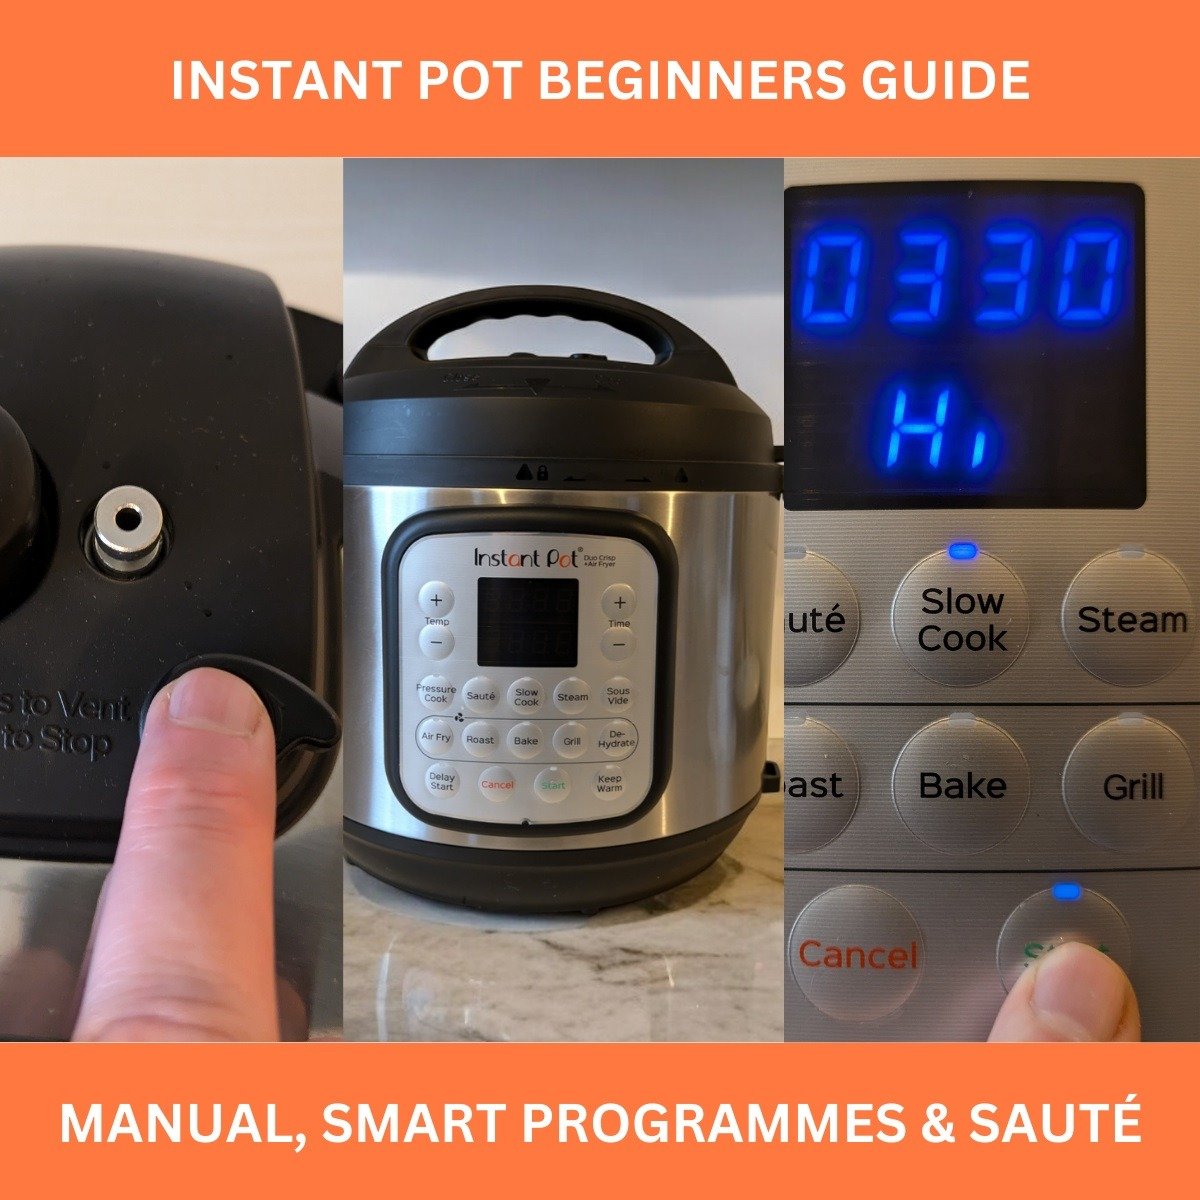
Fortunately for you, I've made it my life's mission to buck that trend and write an entertaining yet informative blog that teaches you how to use Instant Pot Multicooker to become a better cook, enjoy meals, and become a legend of your family's kitchen.
I'll teach you how to use the Instant Pot manual and smart programs, the secret to creating gourmet one-pot meals, the difference between a natural-release and quick-release steam release valve, and more info than you could fit in your Instant Pot.
Which is loads.
Are you ready to enter meal-time mythology?
Let's go.
Jump to:
- Let Me Be Your Instant Pot Guide
- How to Start The Instant Pot
- Instant Pot - More Than An Electric Pressure Cooker
- How To Pressure Cook Without Feeling Under Pressure
- Manual Pressure Cook With Quick Release or NPR (Duo Crisp Style)
- How To Natural Release The Instant Pot Pressure Cooker
- How To Quick Release The Instant Pot Pressure Cooker
- How To Use the Sauté Function on Your Instant Pot
- Using the Instant Pot Steamer Function
- Using the Instant Pot Slow Cooker Function
- More Tips For Getting To Grips With Your Instant Pot
- Instant Pot FAQs You Might Not Have Thought Of
Let Me Be Your Instant Pot Guide
Learning how to use a new appliance with so many features, functions, and options can be a tad overwhelming, especially if you're a bit of a technophobe *cough**like me**cough*.
But despite their commanding aura of superiority and majestic yet complex appearance, most Instant Pot models are surprisingly user-friendly.
Once you know what you're doing.
If you've yet to read our 'Instant Pot for Beginners' series, we cover what the Instant Pot is and how the key features work. They're well worth a read if you're a complete IP noob.
If you already know how to use an Instant Pot to your advantage, you can skip this.
How to Start The Instant Pot
Step 1
Place the Instant Pot on a sturdy countertop or a table close to a power socket. Make sure there is plenty of open space above the pot as you will have steam eject from the lid up in the air if you quick release the pressure.
Step 2
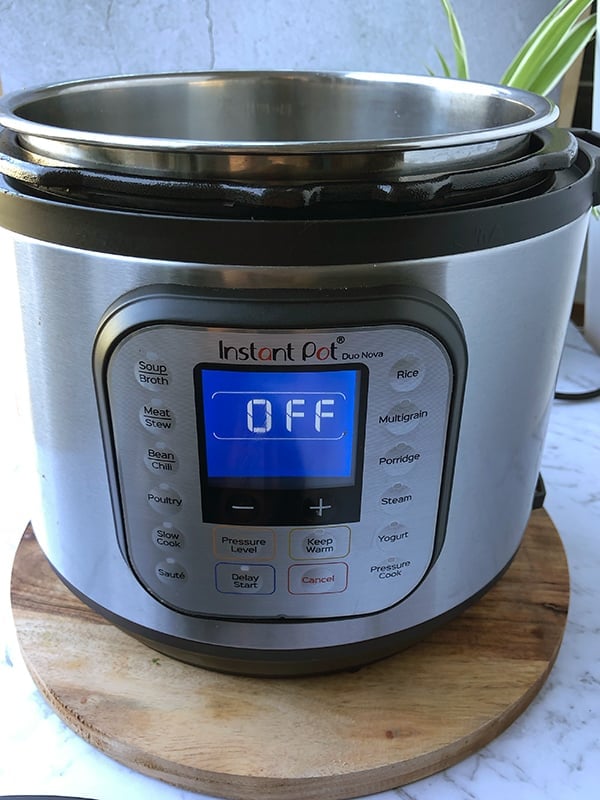
Make sure the inner pot is inside the cooker base and is clean. Plug the power cord in. Instant Pot will switch on and the OFF status symbol will appear on the control panel. This is called a standby mode.
Step 3
Decide which cooking method you want to use from the scenarios below. This will depend on what you want to cook. Usually, recipe instructions will guide you along here.
Your choices will be determined by whether you want to Sauté food first and then whether you want to use a manual setting or one of the smart programs.
Instant Pot - More Than An Electric Pressure Cooker
Instant Pot multicookers are best known for their pressure cooking capabilities. In fact, Instant Pot has become so intrinsically linked to pressure cookers that there's a whole army of people who will call ANY electric pressure cooker an Instant Pot (Hi Mum!).
In actuality, even the most basic Instant Pot model is capable of so much more than forcing hot steam into your food to cook it.
Here are the top 15 features and functions available across the Instant Pot range:
- Bake
- Steam Cooking
- Pressure Cook
- Slow Cook
- Sauté Mode
- Rice Cooker
- Yogurt Maker
- Sous Vide
- Sterilizing Mode
- Keep Warm
- Air Frying
- Dehydrating
- Delay Start
- Customizable Programs
- Auto Shut-off
While I'm going to take a look at the four best features and usable functions, I wouldn't be able to cover every single function in the Instant Pot range without writing a multicooker version of War and Peace.
How To Pressure Cook Without Feeling Under Pressure
As Instant Pots are best known for their pressure cooking capabilities, it's a good idea to give you what you're probably looking for and teach you how to use this function first.
1. Pressure Cooking Stages - What You Need To Know
Cooking with the pressure cooker on any Instant Pot has three phases: preheating and pressurizing, cooking, and depressurizing. Once you've added all your ingredients and the required amount of water to the stainless steel inner pot and you're ready to get steamy, the following will happen.
Preheating & Pressurizing: When you start the cooking cycle, the Instant Pot turns the water into steam and creates pressure inside. Pressurization can take 5-20 minutes, depending on how much food and liquid you add.
Cooking: When steam and pressure build up to the required levels inside the Instant Pot, they have nowhere else to go but into your food. At this point, the timer will start to count down.
Depressurizing: When the pressure cooking cycle finishes, you need to release the steam before you can open the Instant Pot and chow down on your food. There are two ways to do this.
- Natural Pressure Release (NPR)
- Quick Release (QR)
Unsurprisingly, natural pressure release occurs organically if you leave the Instant Pot to do its thing. It'll take about 10 or 20 minutes and is a good option if you're not in any rush or want to start your pressure cooker while you go shopping or something.
If you're in more of a rush, you can use the quick-release valve to get the hot stuff out of there as fast as possible. Only once the steam has been evacuated can you safely remove the lid.
2. Getting Ready - Proper Preparation Prevents Poor Performance
Whether you’re making rice, chicken breasts, pot roast, carrots, or stew, you can't pressure cook without liquid to create steam. You will need between 1 and 1.5 cups of liquid for the Instant Pot to do its job.
While the amount can vary from recipe to recipe, you can't go wrong with my recommendation. However, it's better to be over rather than under.
Top Tip: One of my favorite Instant Pot tips is that the liquid needed to build steam doesn't necessarily have to come from plain old water. If you want to infuse your food with magnificent flavors, try using different liquids like:
- Stock or Gravy
- Wine or Ale
- Tomato Juice
- Meat Juices
Never completely cover the ingredients with water; otherwise, you'll end up with a soggy mess, and nobody wants that.
3. Check Your Instant Pot Lid - Better Safe Than Frustrated
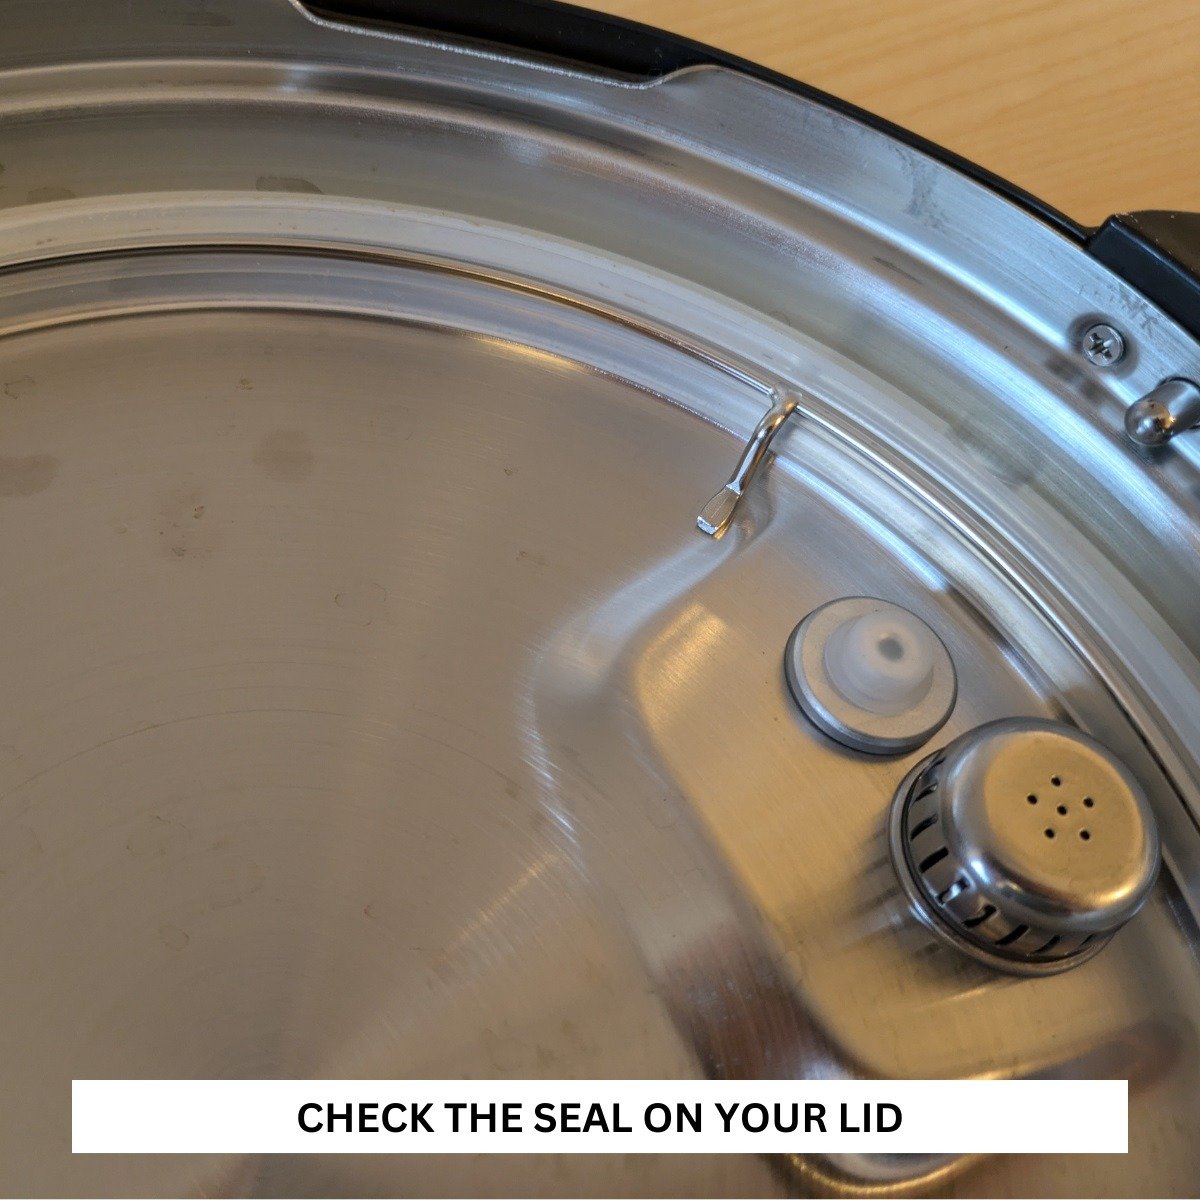
Even if you're using a brand-new Instant Pot model, checking your lid before you engage the pressure cook cycle is good practice for your appliance's functionality and safety.
Check the Sealing Ring: Turn your pressure cooker lid upside down and make sure the silicone ring is in place. If it’s loose or sticks out, the pot won't seal properly and will not be able to come to pressure. Place it on top and twist it until it locks in place.
Check the Pressure Steam Release Valve: Most newer Instant Pot models automatically seal when the cooking process begins, but some older units have a valve you'll want to check before use. Depress the button that says ... well ... press on it until it clicks, and then turn it anti-clockwise to release it. You'll press this button to release the steam when you're finished pressurizing your food.
Manual Pressure Cook With Quick Release or NPR (Duo Crisp Style)
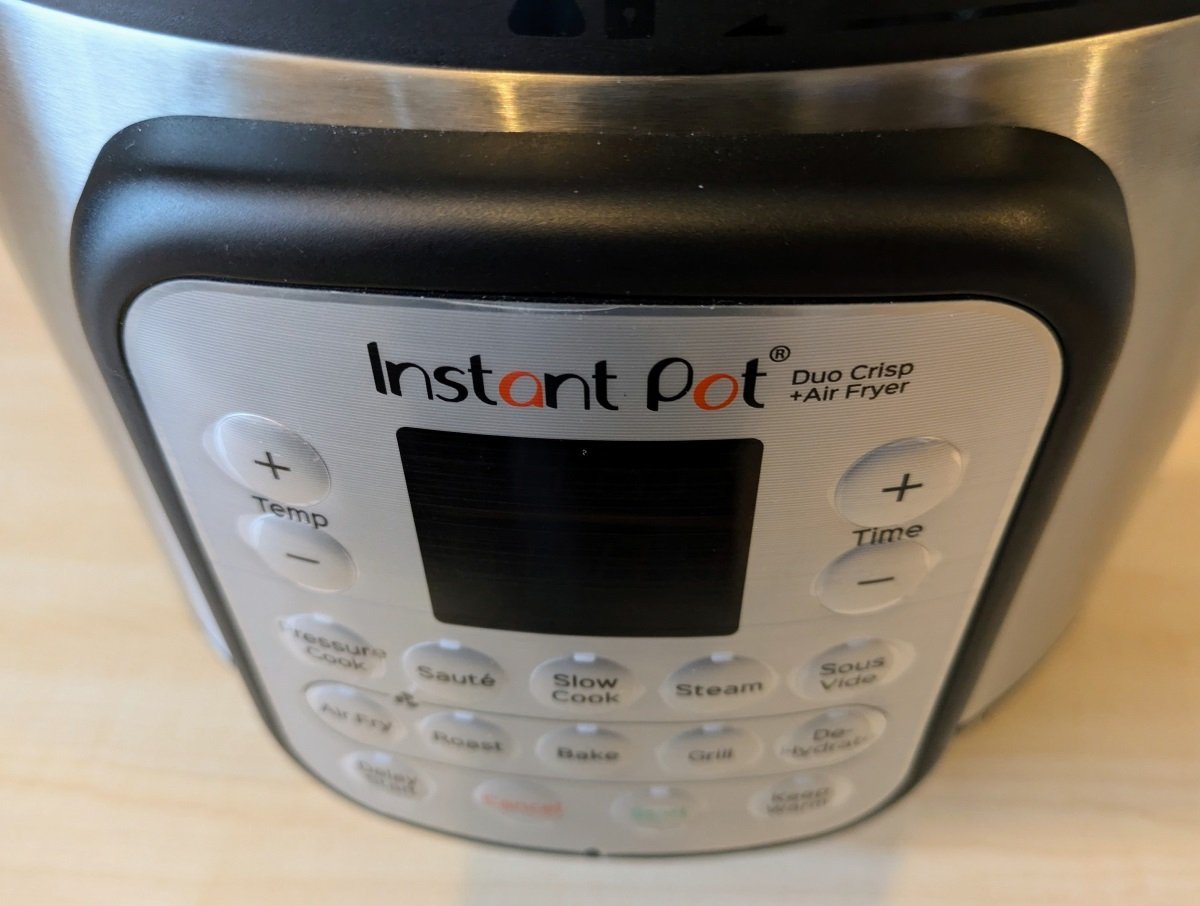
Using the pressure cooker on Instant Pot models is a fairly standard process across the board, but I'll be using the Instant Pot Duo Crisp for this demonstration. My steps here will give you a good understanding and can easily be applied to most Instant Pot models if you’ve got a different version at home.
1. Prepare Your Ingredients
Add your food, seasonings, and liquid into the inner pot. Remember that Instant Pots need liquid to build up pressure, so always include at least a cup of water or broth unless your recipe specifies otherwise.
If you add thicker ingredients like tomato sauce or paste, avoid stirring too much, as these can sometimes cause burning on the bottom of the stainless steel inner pot, and nobody wants the pain of scrubbing burnt food off stainless steel.
2. Close and Lock the Lid
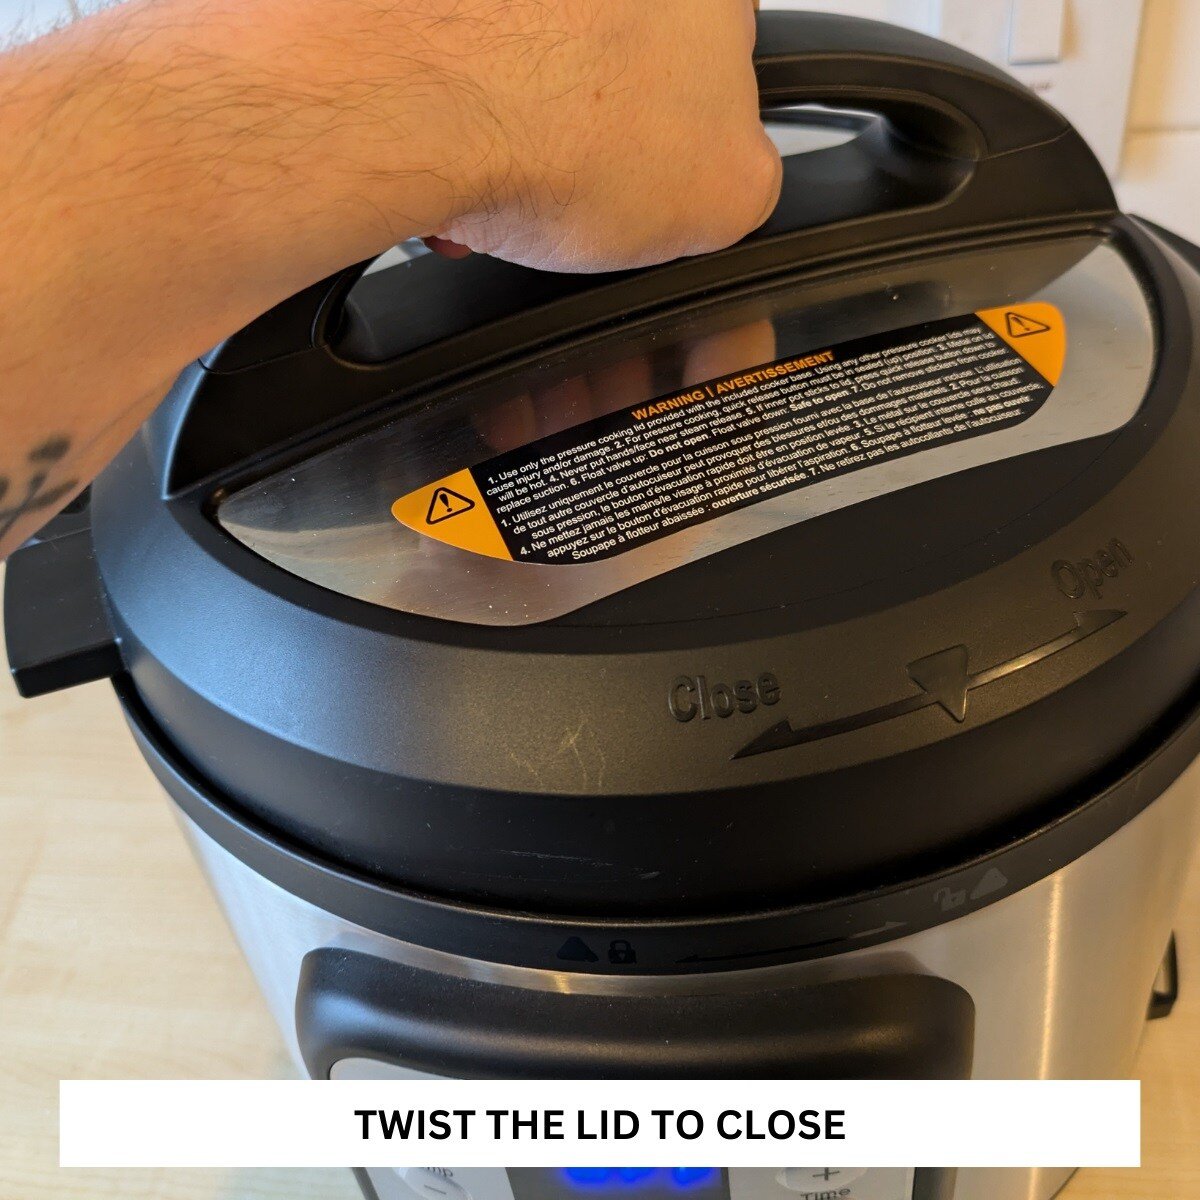
Get your lid and check that the sealing ring on the inside is in place. If it’s loose or sticks out, the pot might not seal properly and it will not be able to come to pressure. Align the Instant Pot lid with the pot and twist it until it locks in place.
On older models like Duo Classic, check that the steam release handle on top of the lid is pointing to Sealing. On the Duo Nova, the quick-release button should be popped up and not pressed down.
The Duo Crisp model automatically seals when you start cooking, unlike some older models that require you to set the steam release handle to “sealing manually.” This feature saves a step and helps prevent accidentally leaving the valve open.
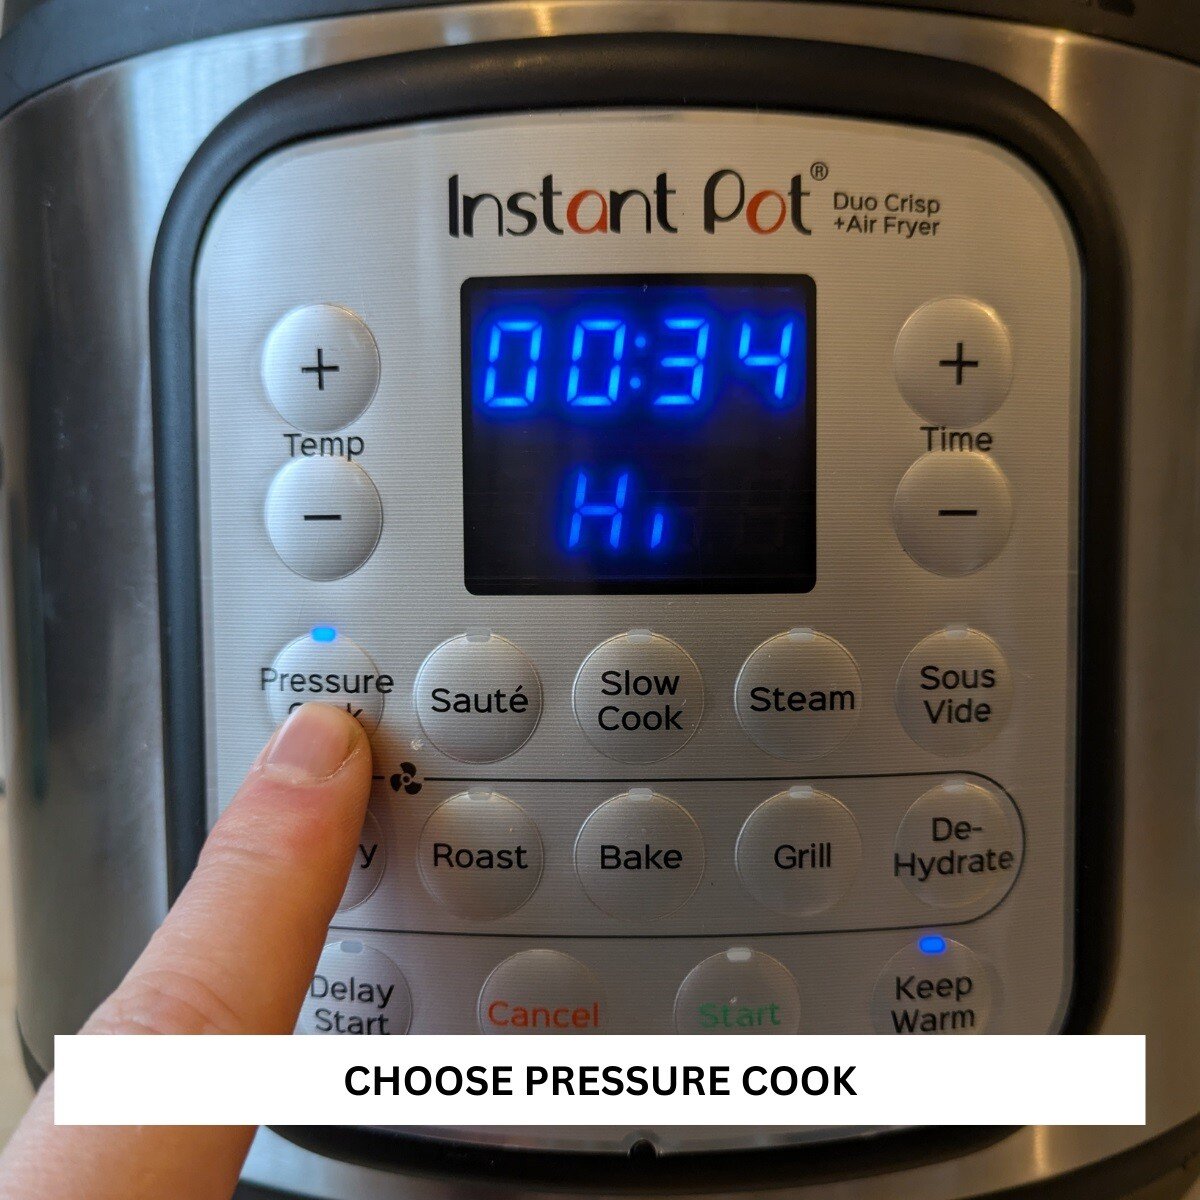
3. Select Pressure Cooking Mode
Press the 'Pressure Cook' button on the control panel (Manual on older models). The timer will appear on the screen, and you can choose between 'HIGH' or 'LOW' pressure using the Pressure Level button. I'm not going to lie; I've never used the low-pressure setting and can't envisage a scenario where I would need it. The high-pressure setting cooks faster and more efficiently. Maybe you'll find a reason?
4. Set the Cooking Time
Use the +/- buttons to adjust the timer according to your recipe. For example, set the timer to 5 minutes if you're cooking long-grain rice. Remember that this timer reflects the active cooking time once pressure has been reached, not the total cooking time. So, factor in the pressurization time into your meal prep if you want to avoid lots of angry faces sitting around the dinner table while you continue to sweat in the kitchen.
5. Preheat and Build Pressure
After you've set the time and pressed start, the Instant Pot will start heating up and building pressure. You’ll see 'On' displayed on the screen, indicating the preheating phase. This stage can take a few minutes, depending on the amount and temperature of the liquid. You might hear a hissing sound as the pressure builds; don't worry, this is normal, your Instant Pot isn't about to explode.
6. Cooking Timer Begins
Once the Instant Pot reaches full pressure, the float valve will pop up, and the cooking timer you set will start counting down.
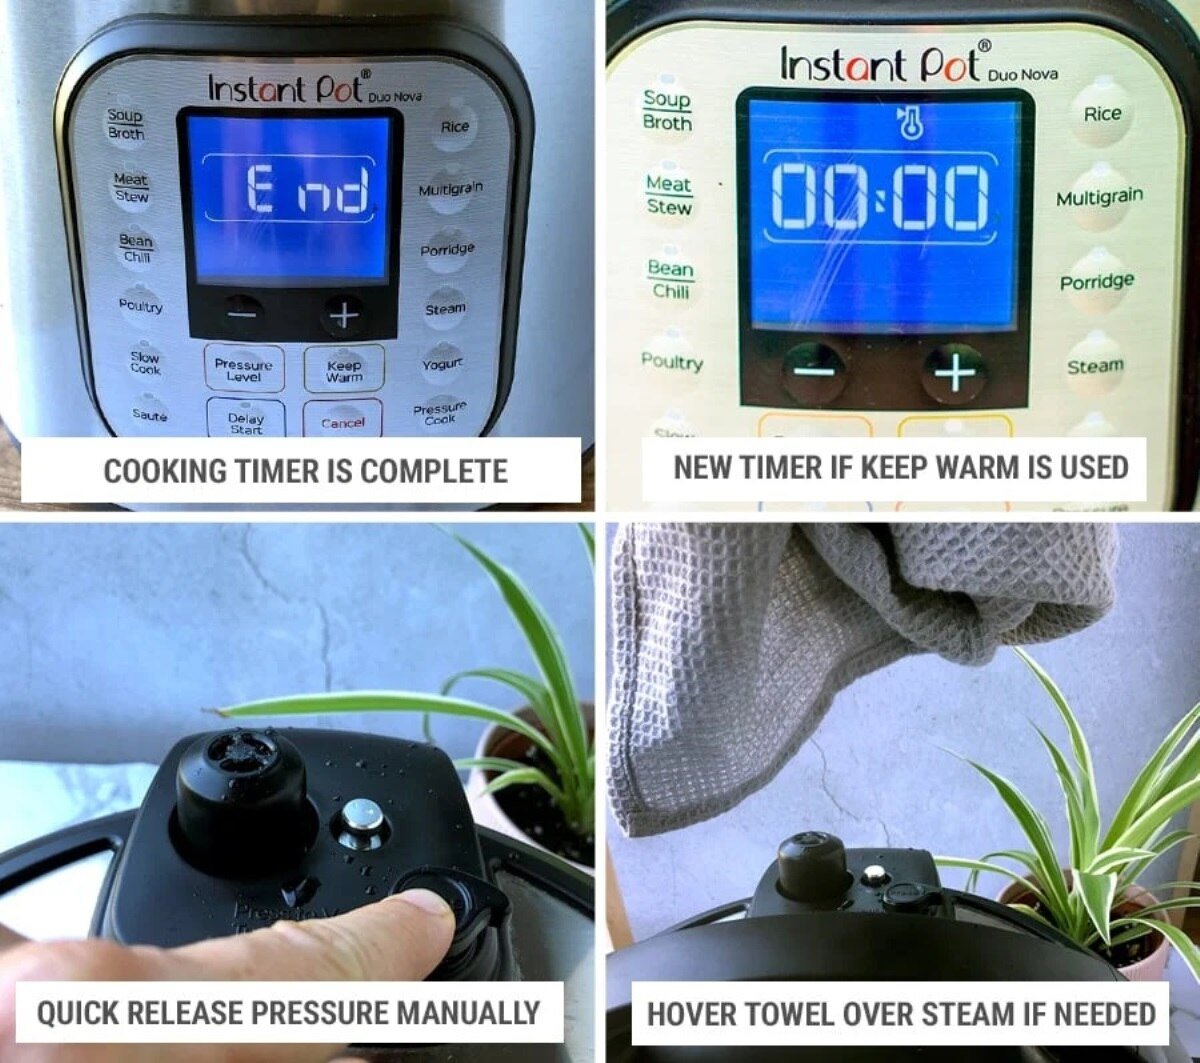
7. End of Cooking
When the timer hits zero, the Instant Pot will beep to signal the end of the cooking process. The screen may display End or switch to Keep Warm if that feature is enabled.
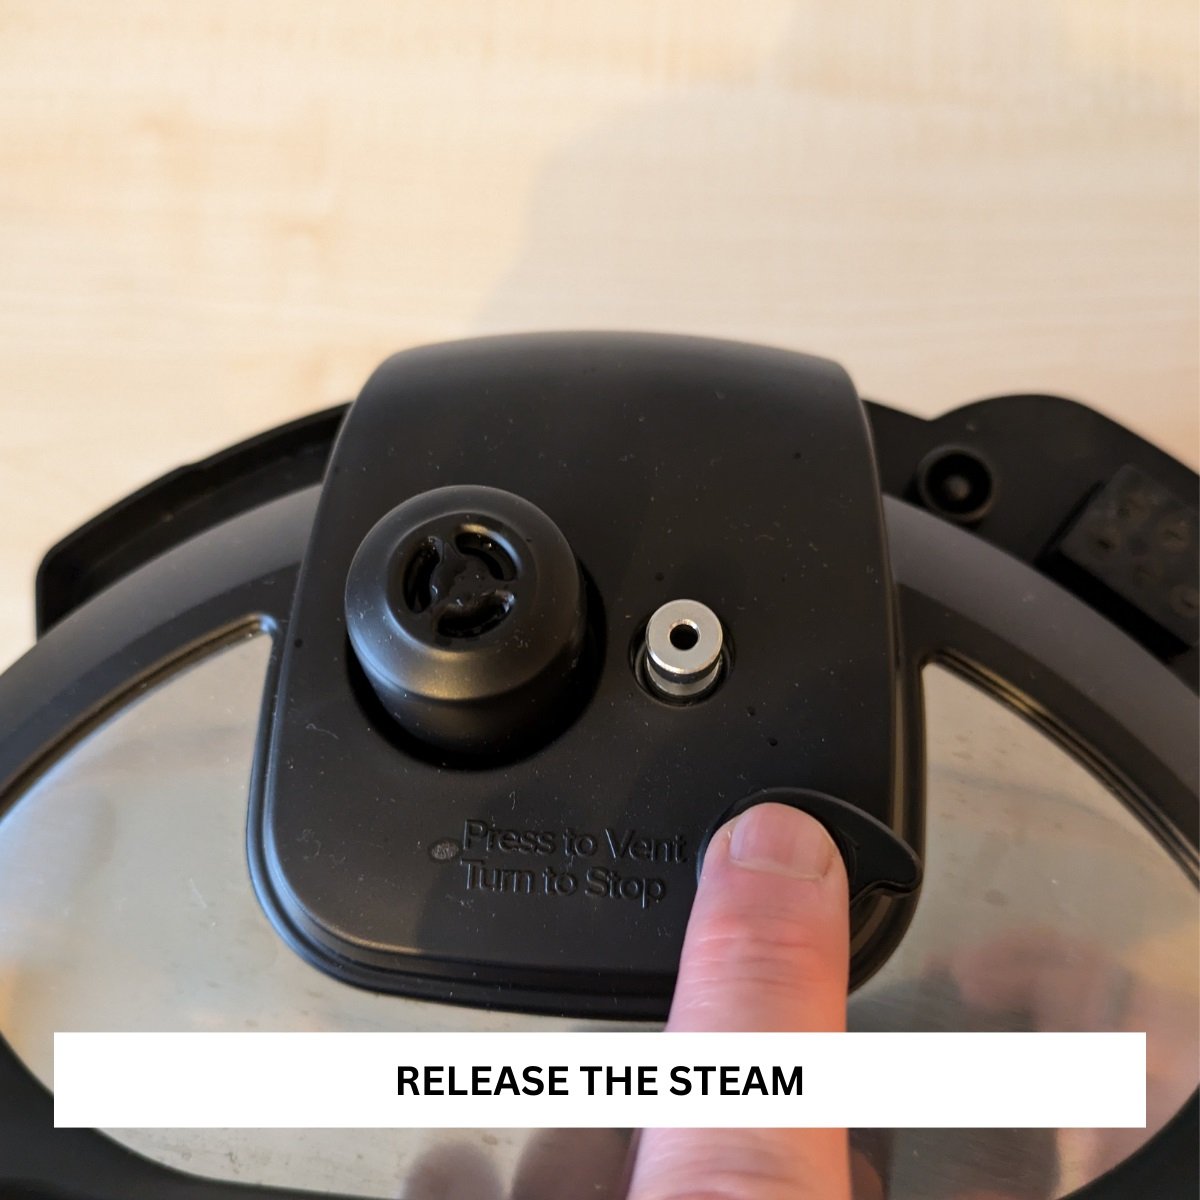
8. Release Pressure
You have two options: Quick Release (QR) or Natural Pressure Release (NPR). For QR, press the quick-release button to manually release the steam—perfect for quick-cooking foods like vegetables. For NPR, let the pressure release on its own; this is ideal for soups and stews as it gradually cools and keeps flavors intact.
9. Unlock and Remove the Lid
To unlock the lid, grab a fistful of the handle, turn it anti-clockwise until it clicks, and take it off. Remember that your Instant Pot lid has just been subjected to extremely high temperatures and pressures and will be exceedingly hot, so it's not a good idea to touch it or set it down on anything that could melt.
How To Natural Release The Instant Pot Pressure Cooker
Easy! Don't touch it. Leave it alone. Hands off!
The Instant Pot will release all the steam and pressure by itself after a while (anywhere between 10-25 minutes). Once the pressure is released, the float valve on the top will drop back down, and the lid will loosen up, allowing you to open it. However, if you leave the appliance to release the steam naturally, it's worth noting that the temperature inside the pot will still be pretty toasty, and your food will continue to cook.
How To Quick Release The Instant Pot Pressure Cooker
Using the quick-release method is the optimal way to let all of the steam out of your pressure cooker in one go without overcooking your food. Simply press the 'quick release' button on top of the lid (or point the steam release handle on older models to 'venting').
The quick-release vent is no joke. Skin-blistering steam will blast out of the vent the second you open it, so make sure you get your hand out of the way faster than The Flash hiding his adult magazine collection when his parents come to town. If you're worried, wrap a kitchen towel around your hand before pressing the button.
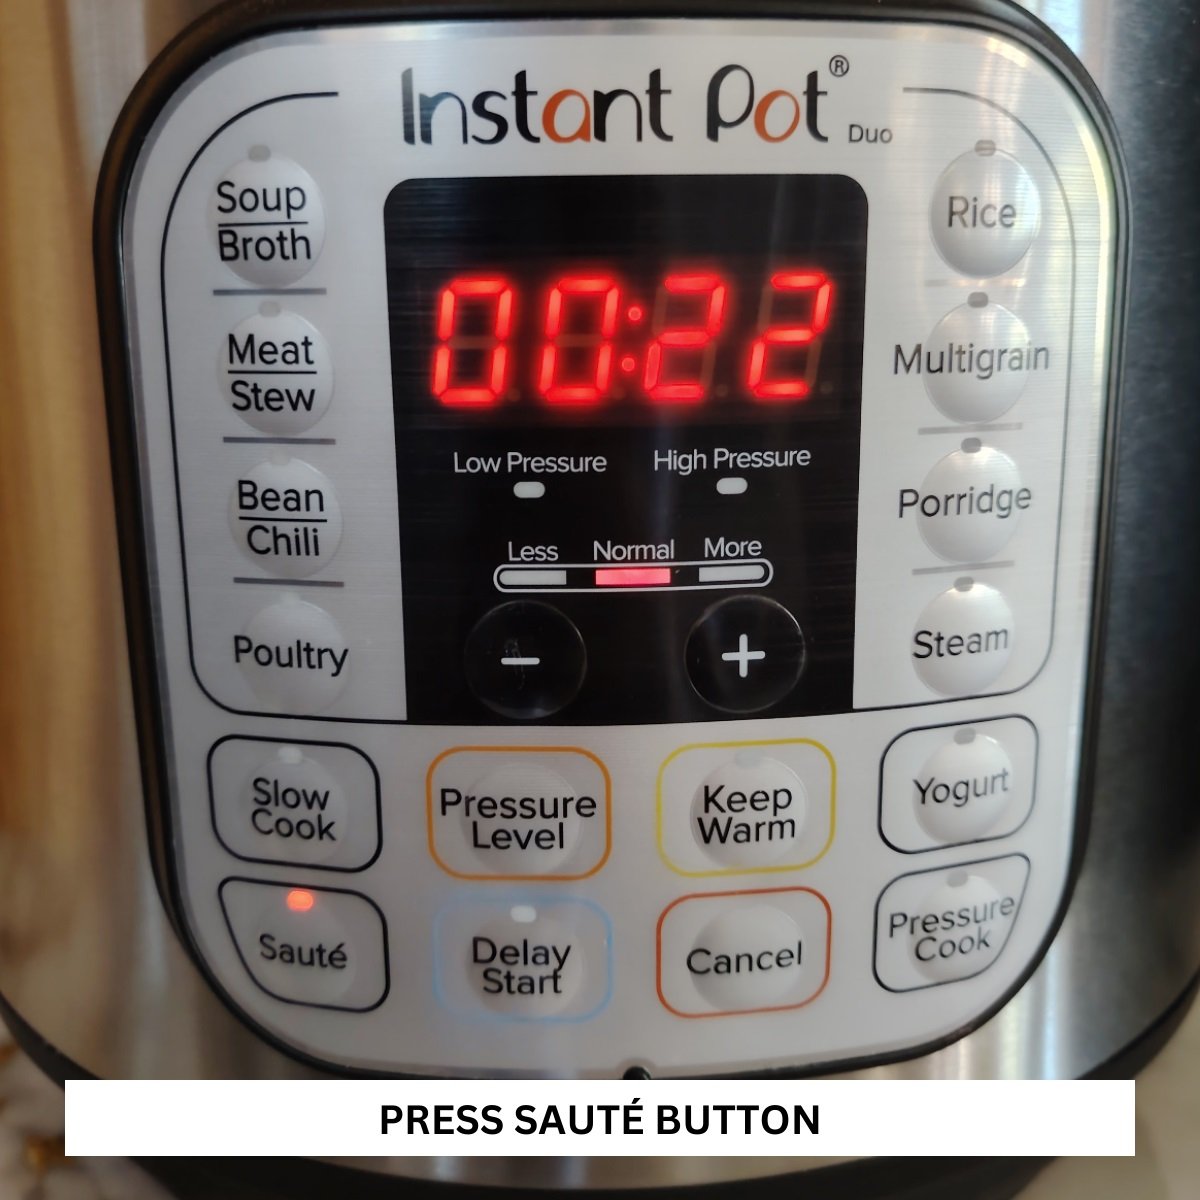
How To Use the Sauté Function on Your Instant Pot
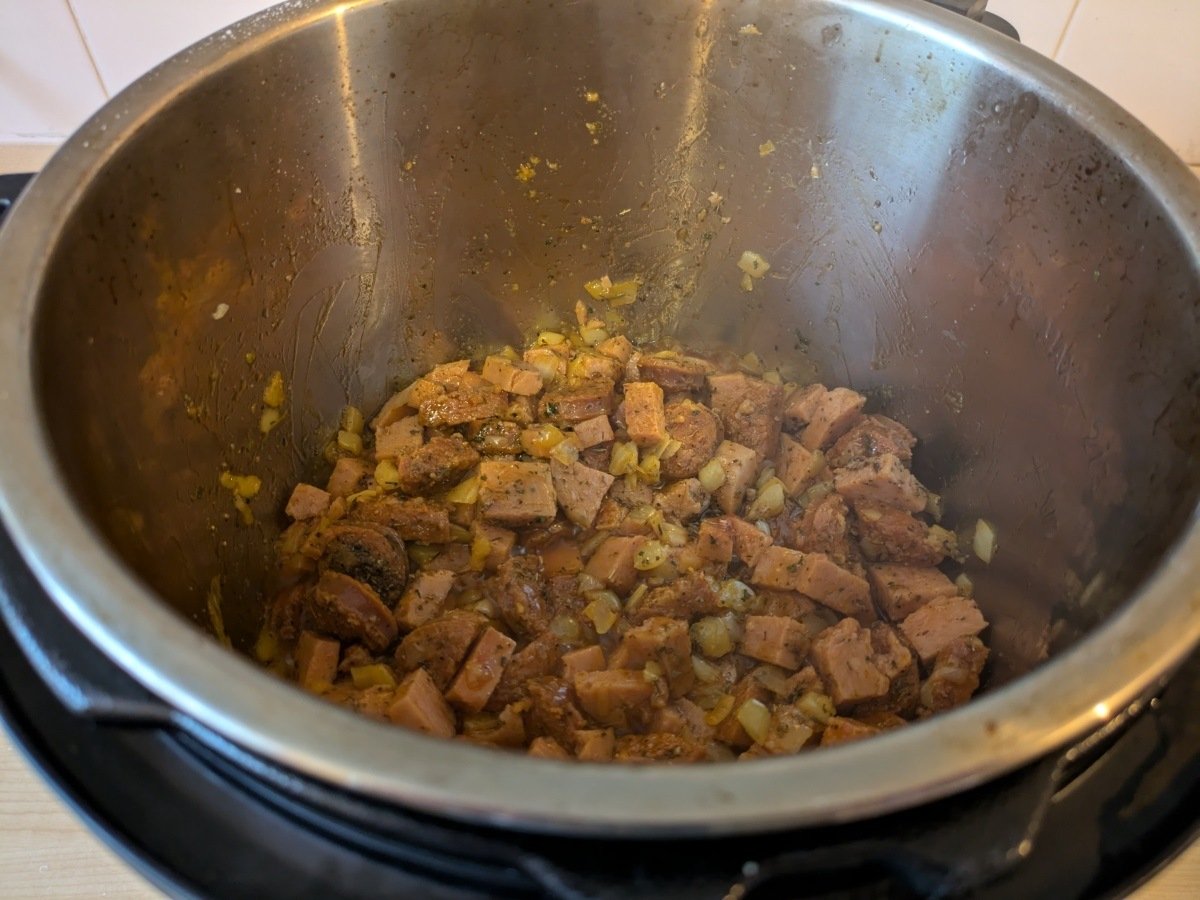
If you want to add a little extra flavor to your meals or brown your meat before pressure cooking (or after), the Instant Pot’s sauté feature is just what you need. This versatile feature lets you sear, sauté, and simmer in the same pot, saving you from using extra pans on the stove and avoiding my pet hate ... washing up!
Getting Started with Sauté
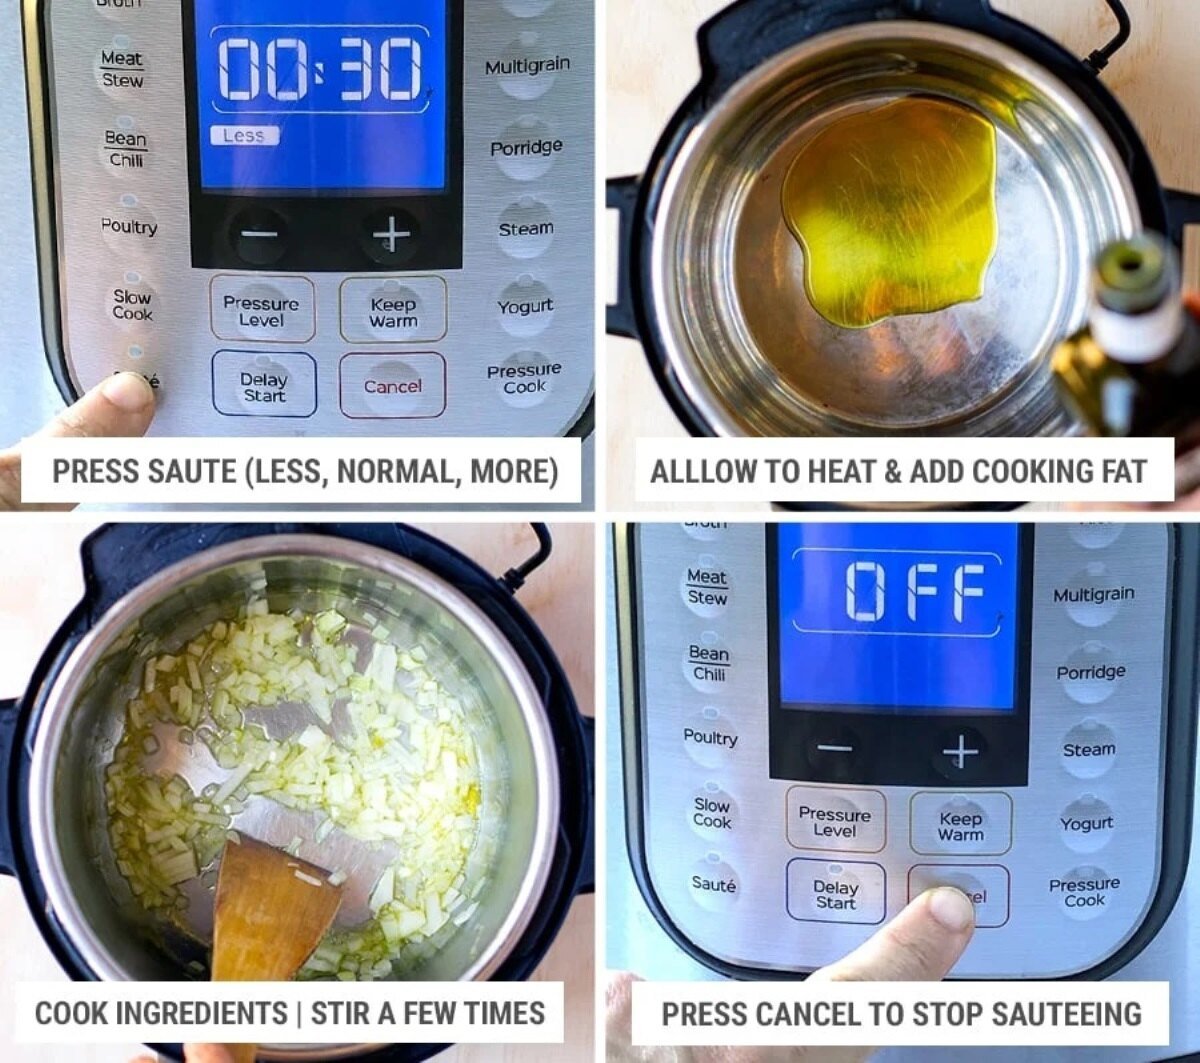
- Turn on the Sauté Mode: Give the 'Sauté' button on your Instant Pot's control panel a jab with your thumb. You’ll notice that it defaults to a medium heat setting. Depending on your recipe, you can adjust the heat to 'Less' (low), 'Normal' (medium), or 'More' (high). Press the 'Sauté' button multiple times to cycle through the heat levels.
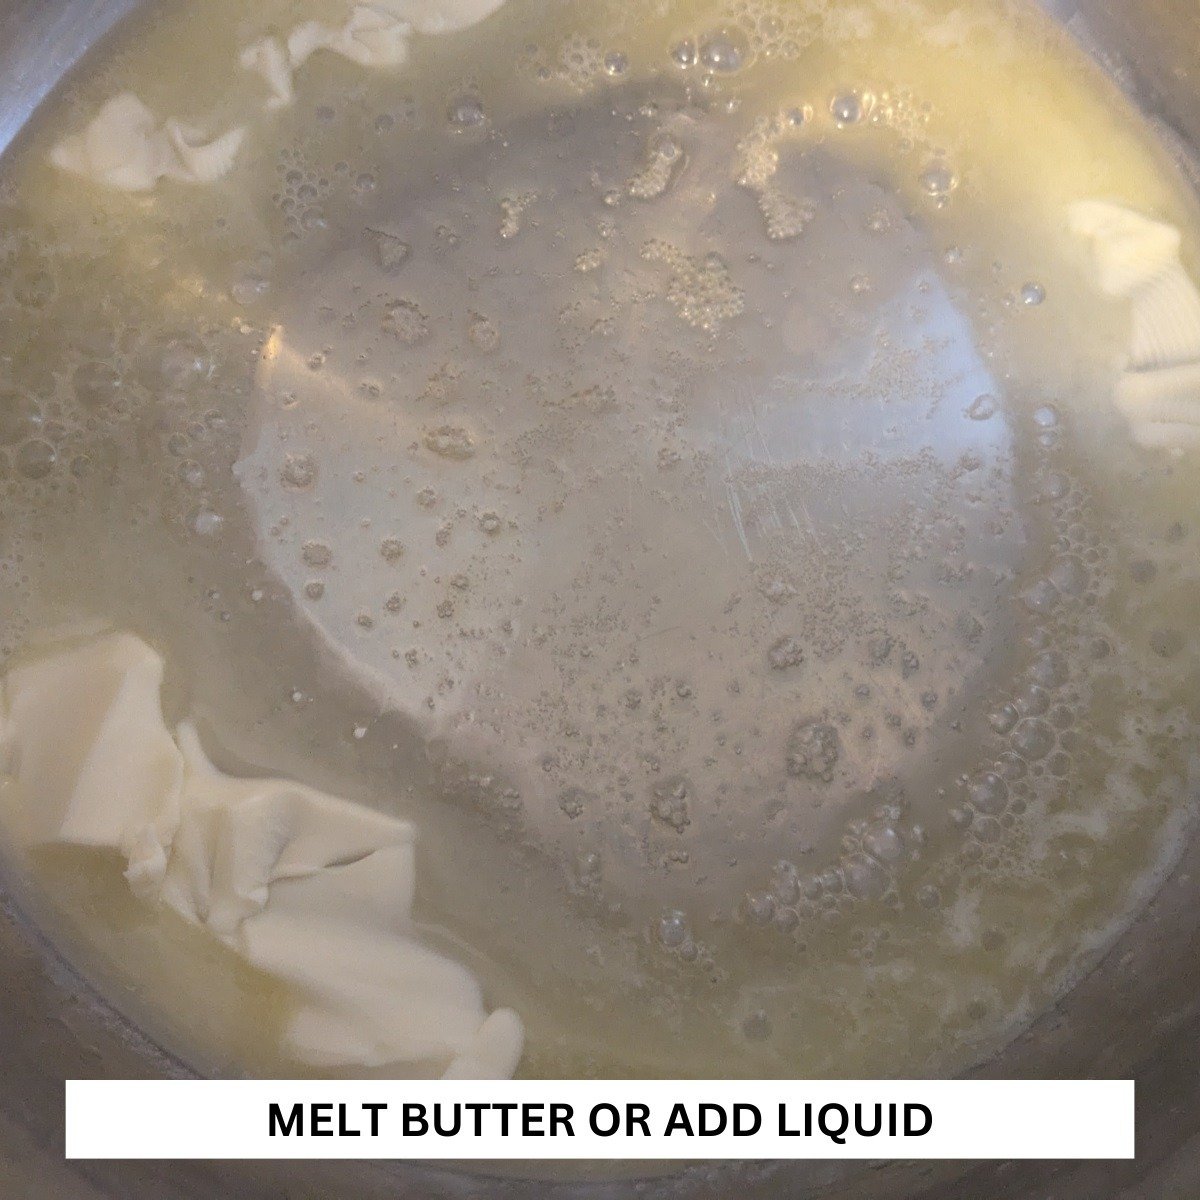
- Add Oil or Butter: Allow the pot to preheat slightly, which takes about a minute or two. Once it's warm, add a small amount of oil or butter to the inner pot. This will prevent food from sticking and help create a nice sear. But don't leave it too long before adding your ingredients, as the stainless steel inner pot is prone to staining, which looks gross and is a pain to remove.
- Sauté Ingredients: Place your ingredients into the pot and stir occasionally. Be sure to use wooden or silicone utensils, or you'll damage the inner pot. Whether you're browning onions and garlic for a stew, searing meat for extra flavor, or toasting spices, keep an eye on the food as the sauté function heats up quickly.
Adjusting the Sauté Temperature
One of the best things about the Instant Pot's sauté feature is the ability to control the heat. Here’s how to choose the right temperature for different types of cooking:
- Less (Low): Great for simmering sauces or gently cooking delicate vegetables.
- Normal (Medium): Ideal for browning onions or lightly sautéing veggies.
- More (High): Use this setting to sear meat or achieve a deeper browning.
Ending the Sauté Function
Once your ingredients are sautéed to perfection, press the 'Cancel' button to end the cooking cycle. It's important to cancel the hot stuff to prevent overheating if you're transitioning to another cooking method.
The inner pot will stop heating, allowing you to safely add more ingredients or liquid if you plan to use another cooking function, like pressure cook. But make no mistake, the pot will still be red hot for a while even after you've canceled the function, so please be careful. Nobody wants crispy fingers.
Deglazing the Pot
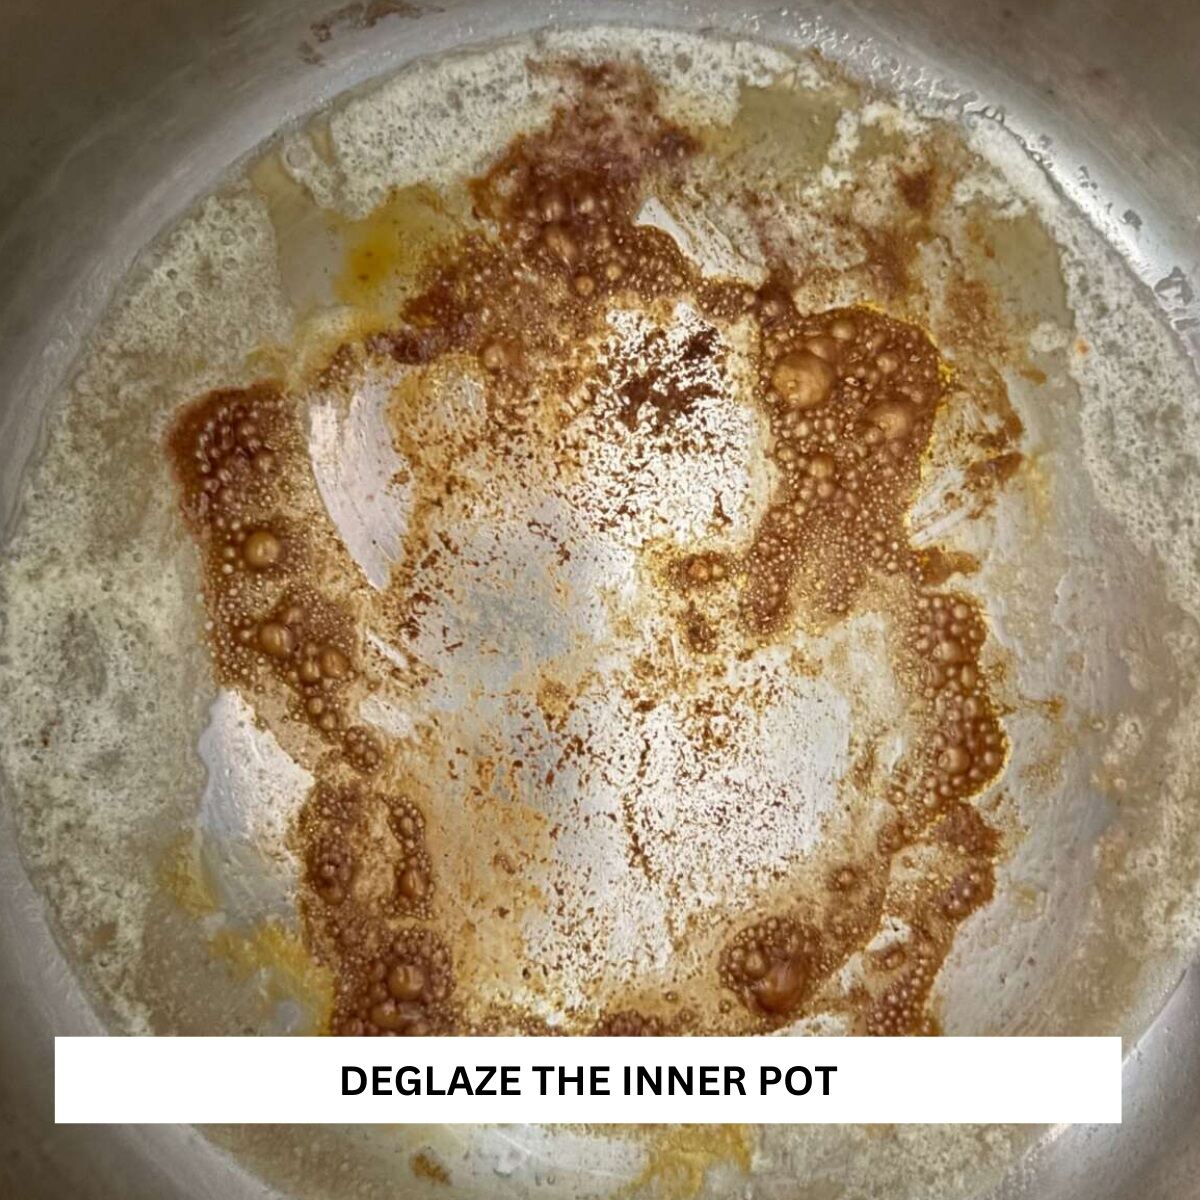
After using the sauté feature, you might notice some browned bits stuck to the bottom of the pot. Some people think it's gross, but I love burnt stuff and often use it to flavor my food.
This residue is packed with flavor, and it’s an excellent idea to deglaze the inner pot before using the electric pressure cooker. Add a splash of broth, wine (if you've got any left, I never do), or water to the pot, and use a wooden spoon to scrape up the bits. This prevents burning during the cooking process and adds a boost of flavor to your dish.
Why Sautéing Adds Depth to Your Instant Pot Meals
The sauté is one of my favorite things about my Instant Pot, as it eliminates the need for cumbersome frying pans and my standard range.
By browning ingredients first, you caramelize natural sugars, enhance their flavor, and build layers of flavor that you just don't get from pressure cooking alone. The sauté step can make a big difference, especially in Instant Pot recipes for soups, stews, and braised dishes. Give it a try next time you're using your Instant Pot, and you’ll see how a little extra effort at the start can lead to rich, savory results in the end.
Using the Instant Pot Steamer Function
Next up, I'll cover the Instant Pot's healthiest cooking function: the humble steamer.
Again, I'm using my Instant Pot Duo Crisp for this demonstration, but don't fret if you’re using a different Instant Pot model; most steps are universal enough to follow these steps for success.
Prepare Your Ingredients and Set Up
Place the food you want to steam (think veggies, dumplings, or that leftover dim sum you can't let go of) in a steamer basket (you can use the air fryer basket if you have a Duo Crisp) or on a trivet inside the stainless steel inner pot.
Add a cup or so of water to the bottom of the pot. I always use about 250ml, and I've never had any issues.
Note: With too little water, you'll run out of steam and burn your food, creating an all-mighty mess that will take you longer to clean than it took to cook your food. Too much water and your food will be a soggy mess that everyone will say was delicious, but they'll secretly judge your cooking skills.
Lock It Up
Twist the lid to seal it in place. If you’re rocking the Duo Crisp, you're already set, as it auto-seals, making it ideal for people with terrible memories (like me, who can't remember my own kid's names half the time).
If you’re on an older model, flick that steam release handle to “sealing.” Otherwise, you’ll change your kitchen into a sauna rather than steaming your veggies.
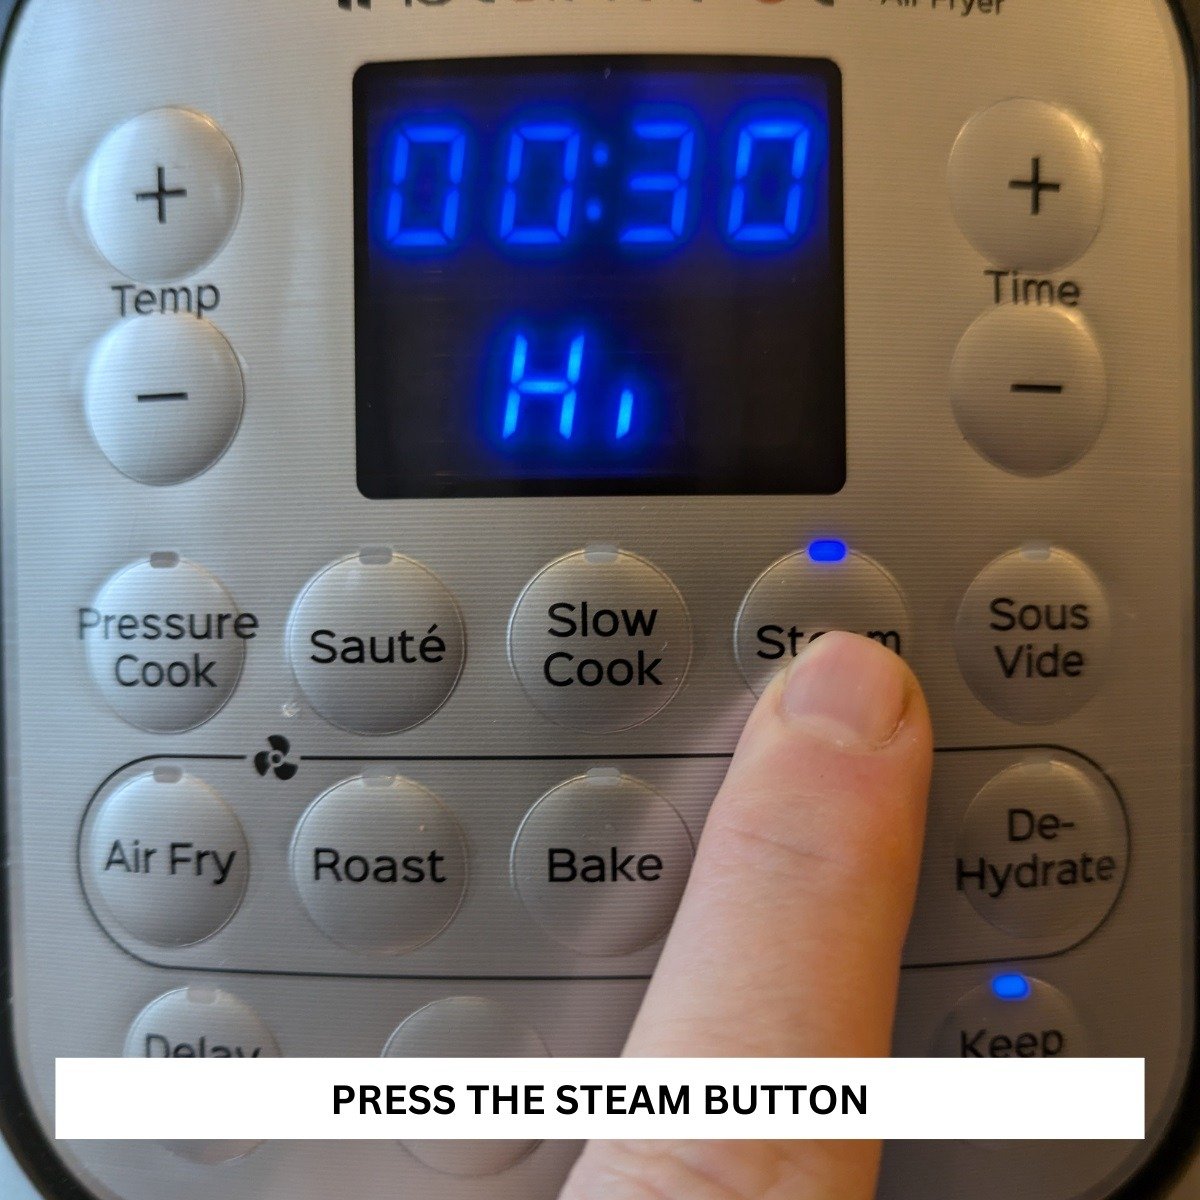
Choose The Function & Steaming Time
Find and press the 'Steam' button on your control panel. Adjust the cooking time using the +/- buttons to suit your food. Just like sauteing, the trick is to avoid overdoing it. You want steamed veggies, not a mushy soup.
Steam Away!
Once you press 'Start,' the Instant Pot will begin its preheating phase. In a minute or two, it’ll kick into steaming mode, and your timer will start. You’ll know it’s working if you hear a gentle whoosh of steam and smell that signature veggie aroma, which can be a pro or a con, depending on your nasal proclivities.
Quick Release for Delicate Foods
When the timer beeps, do a quick release to avoid overcooking. Hit the quick-release button or flick the steam release handle to 'venting' if you’re feeling a bit old school.
Lift and Serve
Once the pressure’s fully released, turn the lid counterclockwise and lift it off. Voilà! Perfectly steamed food, ready to be devoured. Just remember: that steamy lid is hot. Handle with care or risk branding yourself like a grilled cheese.
Using the Instant Pot Slow Cooker Function
The slow cooker feature is where the Instant Pot shifts gear from a high-speed train to a sleepy Sunday afternoon drive. It's ideal for low-and-slow dishes that make you look like a gourmet chef with practically zero effort.
I love using the feature first thing in the morning before I start work. I'm all about getting home after a hard day to a house filled with mouth-watering smells and not needing to make dinner.
Load Your Ingredients
Load up your pot with all your favorite slow-cooker ingredients (which you may or may not have pressure-cooked, steamed, and sauteed in your Instant Pot first). Think hearty soups, stews, or fall-off-the-bone meats.
There’s no need to add heaps of water as you would for pressure cooking, but do make sure your ingredients are submerged if your recipe calls for it. You're looking for a gentle simmer, not a soupy hot tub.
Lid Check and Lock
For the Duo Crisp, you can actually use the Instant Pot glass lid for slow cooking (just like on the stovetop). Don’t have a glass lid? No problem! Use the regular lid, but keep the steam release handle set to “venting” to allow slow, steady release.
Select the Slow Cook Button
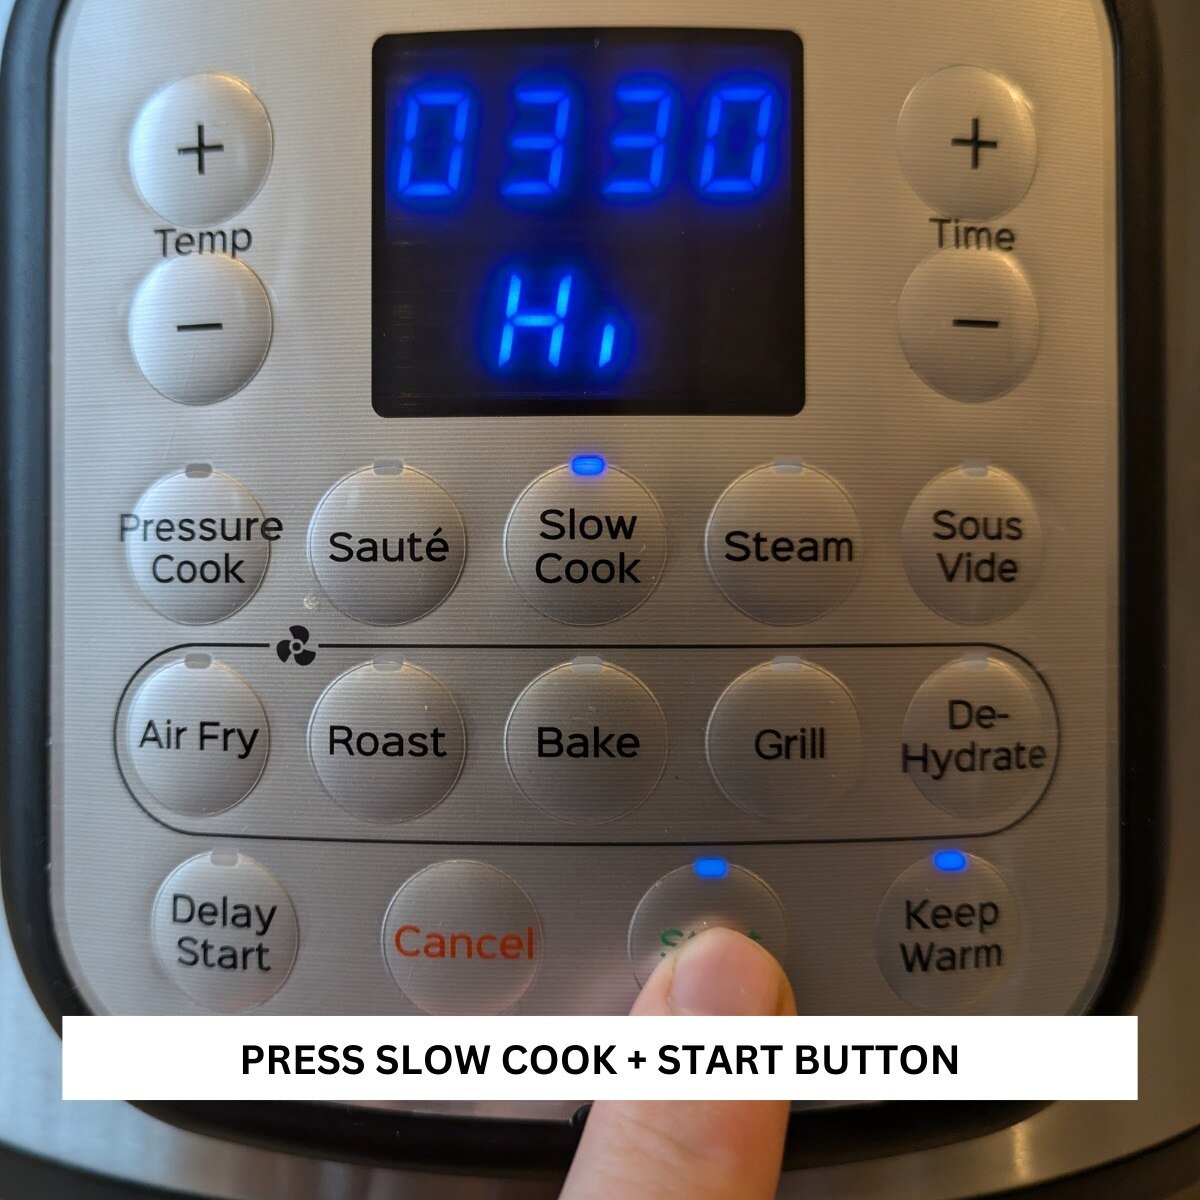
Now, it’s time to press the 'Slow Cook' button. Adjust to 'Low' or 'High' depending on your recipe. You can also set the cooking duration with the +/- buttons, giving you total control over when you want your culinary masterpiece ready to serve to the masses.
Slow Cook Mode Activated
Once you start the slow cook function, you’re on autopilot. The Instant Pot takes over, gently cooking your food to tender perfection. Bonus: You can leave it going for hours while you throw back a few b̶o̶t̶t̶l̶e̶s̶ glasses of wine or e̶n̶d̶l̶e̶s̶s̶l̶y̶ d̶o̶o̶m̶ s̶c̶r̶o̶l̶l̶ o̶n̶ s̶o̶c̶i̶a̶l̶ m̶e̶d̶i̶a̶ read a book.
Unveil and Serve
When the cooking time is up, your Instant Pot will automatically switch to the 'Keep Warm' setting (unless you’ve opted out). Carefully lift the lid, letting that warm, home-cooked aroma hit you. Remember, everything in there is hot enough to make your skin regret poor judgment, so handle it with care.
And there you have it! The Instant Pot’s slow cooker function: low maintenance, big reward, and zero kitchen drama.
More Tips For Getting To Grips With Your Instant Pot
Now that we've covered step-by-step instructions for using the Instant Pot, I want to share a few general tips to help every Instant Pot beginner master and enjoy pressure cooking without getting overwhelmed or intimidated.
Do Your Homework & Read The Manual
I'm going to be a bit of a hypocrite here because I'm one of those types who lobs the instructions straight out of the window and then proceeds to figure it out as I go.
But, a little research before you begin can go a long way.
It’s not the easiest manual to read, and it lacks detail to help fully understand certain concepts or functionalities (which is why we created our Instant Pot For Beginners series to fill in the missing pieces). Still, hearing the safety instructions straight from the horse's mouth is always wise.
For more detailed instructions and information that is still super friendly and easily digestible, check out our other posts:
DO THE WATER TEST
The water test might seem like you're just boiling water in your Instant Pot, and that's because you are. However, the water test isn't about the outcome; it's an exercise in familiarising yourself with the controls and functions of the Instant Pot in a safe and controlled manner.
It's better to learn your multicooker craft with water because if you mess up, all you have is steam rather than a pot full of burnt or soggy food. It's like taking a driving test in a bumper car; you can't really get it wrong.
The water test is very straightforward if you follow our guide.
Keep It Simple - There's No Rush
Choose simple recipes to start with. Set yourself up for success by beginning with easier dishes so you can develop a more intuitive sense for pressure cooking, sauteeing, and slow cooking as you go. Some of the simplest (and most useful) Instant Pot recipes for beginners include those using a single ingredient or just a handful of foods and steps, such as:
Have Fun & Stay Positive
When we asked our readers about their first experiences with the Instant Pot, the most common advice was to simply enjoy experimenting with it. Let go of any expectations, trust that the Instant Pot is an incredibly safe kitchen tool, and be open to trying new recipes. Even if things don’t turn out perfectly, it’s all part of building your confidence.
Instant Pot FAQs You Might Not Have Thought Of
As I wrap up this extensive and hopefully entertaining guide to becoming an Instant Pot master, I want to take this time to answer any of the few remaining questions that you might not have realized you needed to know.
Low pressure is generally recommended when pressure-cooking delicate foods like eggs, fish, and vegetables. However, you can also cook these foods at high pressure if you reduce the cooking time. If you're unsure which pressure setting to use, opting for high pressure is safer, but check your recipe for specific guidance.
The Instant Pot's trivet is a simple, raised insert that keeps food above the cooking liquid. It benefits dishes that shouldn't come into direct contact with the wet stuff, helping prevent them from becoming soggy. You can place food directly on the trivet or set a heat-proof dish, like a casserole dish or cake pan, on top of it.
This setup is ideal for items like chicken breasts, lasagna, bread, and meatloaf—foods that benefit from steaming but would lose quality if immersed in liquid. The trivet is also great for cooking eggs, vegetables, and potatoes or using the 'pot-in-pot cooking method.' It helps prevent burning your food and your stainless steel inner pot or overcooking, promoting even cooking throughout.
Here are 7 Ways To Use Trivet With The Instant Pot.
The Instant Pot’s "Keep Warm" function is convenient for keeping food warm after cooking, especially if you’re not ready to serve immediately. Foods that absorb a lot of liquid, like rice or quinoa, may need extra moisture or monitoring to prevent them from drying out or burning. The "Keep Warm" setting can be activated either before cooking or once cooking is complete.
High-pressure cooking takes a bit longer to start than its lower counterpart because the Instant Pot needs more time and energy to build up and maintain higher pressure levels. Once the pressure is fully built, cooking speeds up because the boiling point of water is higher, which cooks food faster.
Using the low setting to save time doesn’t work well for most recipes, as the lower boiling temperature may not cook foods thoroughly. High pressure is the default in many recipes to ensure foods are cooked completely and achieve the right texture.
On some models, there’s a ‘Timer’ button, which may seem like it controls the cooking time, but it actually sets a delay. When you press the Timer button, it schedules the cooking to start once the countdown finishes. To set the cooking time, use the plus/minus buttons or the dial, depending on your model.
Yes, cooking times generally need to be adjusted at higher altitudes. Some Instant Pot models, like the Ultra and MAX, allow you to set your altitude, automatically adjusting cooking times. Otherwise, you should increase cooking time by 5% for every 1,000 feet above 2,000 feet. For instance, at 3,000 feet, increase the time by 5%; at 4,000 feet, by 10%, and so on.
Over to you! Do you have any further questions about how to use the Instant Pot as a beginner? What foods or recipes do you plan to cook first? Anything else we can help you with? Leave your feedback and comment below!


Kelly graziano
Need instructions book was given a duo nova by a man who's wife passed
Ann Fabrizio
https://instantpot.com/pages/manuals-and-resources
Deborah
I cannot find anyone who can tell me how to cook a whole chicken, covered with water to make broth! Help!
What setting. Time. I have a poultry setting on mine. I basically want to poach it in the instant pot.
Ann Fabrizio
Hi Deborah, There's more than one way to do this. For a fast version but mild flavor add the whole chicken with water, try setting Manual Pressure to 30 minutes. Then Let the pressure release naturally for about 15 minutes then remove the lid. Here's details: https://www.ricardocuisine.com/en/recipes/8338-pressure-cooker-whole-poached-chicken-and-chicken-broth
Another way thats longer but more flavor, is cutting up the chicken in parts or in half. Set Manual/Pressure Cook timer to 130 minutes. Allow the pressure to release naturally before opening the lid, this should take about 15-20 minutes. Total cooking time is about 3 hours. Here's details: https://instantpoteats.com/chicken-bone-broth-pressure-cooker/
Paul Goode
How do I the InstantPot for slow cooking?
Patriece Fennell
I can’t get it to cook. I’ve had it for 4 years, I bought it from Costco. Can someone please help me and teach me how to use it I don’t even know how to turn it on. I pressed every button I sat and I watched it. I’ve unplugged it. I restarted it but I can’t get it to work for me.
Ann Fabrizio
Please read our begginers hub on buttons. Basically there is no "On" button. You plug it in, follow a recipe, secure the lid, adjust the timer, and move the nob on the lid to seal depending on your model. Then it automatically starts. It will take about 12 minutes to pressurize. Once it does it will begin a count down. Then when you see LO and number it releases the steam, you can do a quick or natural release based upon the recipe.
Alistair Chellew
Can I select a specific temperature using the instant pot duo
Ann Fabrizio
Unfortunately, you can't choose specific temperatures. However, here are some numbers: Sauté button has three different temperature ranges. “Normal” is 320 to 349 degrees Fahrenheit. “More” is 347 to 410 degrees. “Less” is typically at 275 to 302 degrees. Slow Cook has three different temperatures to work with: “Normal” which is 190 to 200 degrees, “less” which is 180 to 190, and “more” which is 200 to 210. Keep Warm/Cancel Button Default Setting: ~63°C/145°F. More Setting (press once): 75°C/167°F. Less Setting (press twice) ~56°C/133°F. Yogurt setting is around 180 degrees Fahrenheit. Pressure Cook/Manuel setting, which could be 10 to 12 PSI could get as hot as 239 to 245 Fahrenheit.
Donna Cannon-Holt
If you accidentally push a selection, how do you cancel it
Instant Pot Eats
There should be a Cancel button you can press to stop any setting.
Harriet Sundermeier
Can I make chicken and lamb together? I don't have the pressure knob... should I get another instant pot or see about getting one?
Ann Fabrizio
I wouldn't advice to cook the two types of meats together. If the knob broke then yes consider buying a new one or calling customer support 800-828-7280 . But if your model simply doesn't come with one, then that's of course a learning curve.
Joanna
Please could you explain how I bring it up to pressure and immediately drop pressure. Its a recipe for chai and has no cooking time. I don't think the timer cam be set to zero?
Ann Fabrizio
Hi Joanna, the Instant Pot pressure cooker should automatically start to pressurize once you have set the timer. It releases the pressure when you move the dial to "venting" depending on your model, you will see extremely hot steam release. Check your instruction manual. It should be able to be set to zero when setting your time.
Robert Smith
Yesterday I tried my new instant pot for the first time. Tried something simple. 1 cup of water, 3 fresh venison loin chops rubbed with pepper and salt only. I used the preset meat button. All went well. Cooked for 20min. I used the quick pressure release feature. The venison was delicious but very dry and a little tough.
How can I make the meat (venison) more moist and tender? Should I have not used the quick release? Any help or advise would be appreciated.
Cheryl Anne Brutkoski
Recipes for instant pot please
Instant Pot Eats
You can find hundreds of those on our blog 🙂 https://instantpoteats.com/instant-pot-recipes/ This is another good post to start: https://instantpoteats.com/best-instant-pot-recipes/
Connie Wester
What's the metal plate for?
Instant Pot Eats
Hey Connie, which metal plate do you refer to? The trivet?
barb s spahlinger
How do i get a manual
Instant Pot Eats
You can find it on the official Instant pot website usually.
Kelly graziano
Need instructions book
Ann Fabrizio
https://instantpot.com/pages/manuals-and-resources
Felicia Kovacevich
Just getting started
Ann Fabrizio
YAY! We are here if you need any inspiration. We are also on Instagram & Facebook. Plus we have a weekly newsletter.
Mary
I've tried to set the timer but it always zeros out and I can't figure out how to do it so I gave up using it but I would like to use it I have no manual a friend gave it to me without one
Debbie Mueller
I prepared a dish that called for adding a vegetable at the end and then steaming the dish for 2 minutes. I wasn't sure how to do that, so this is what I did.
I did quick release, added veggies, replaced and sealed lid and selected steam for 2 minutes. Is that correct? So the pressure has to build up again, correct?
Nina
How do I keep the clock timer on and counting down during cooking?
Instant Pot Eats
It will come one once the pot comes under pressure 🙂
Rich Mazer
Excellent article. Excellent content. Excellent recipes.
Could not have asked for more.
'm a retired Commercial Construction Technician
I only want one set of instructions that seem correct.
Thrse seemed and proved to be spot on.
Best of all I read, and I bet I read them all
I went right to the biggest batch of soaked bean the 8qt would hold. Excellent results. Thank you so much!!!!
Ann Fabrizio
So glad the article was helpful for you Rich.
Marjorie Lax
Ann, I did not get a user manual with my insta pot. Is there a way I can purchase one?
Ann Fabrizio
Hey Marjorie, you can go to their official site and download the manual that matches your model. Here's the link: https://instantpot.com/pages/manuals-and-resources
jean
How to use slow cooker for beef brisket.
Instant Pot Eats
You can use the Slow Cooker function on the Instant Pot the same you would the normal slow cooker. For example, you could use this recipe https://www.recipetineats.com/slow-cooker-beef-brisket-with-bbq-sauce/ and just use the Slow Cook button and adjust the time as needed. This recipe also provides pressure cooker instructions in the NOTES below the recipe. Looks like a good one!
Jo Paczkowski
Is it allowable to change the pressure setting from low to high once the process has started?
Ann Fabrizio
Unfortunately no. You have to cancel and start over. Should you do this and not open the lid, no time will be wasted at least as it will still have some pressure built up inside.