The Instant Pot is like a magician in the kitchen, pulling off the seemingly impossible feat of cooking meals at breakneck speeds. But there’s no hocus pocus involved - it’s all thanks to the power of Instant Pots.
Importantly, the Instant Pot significantly reduces cooking time compared to traditional cooking methods by utilizing this efficient pressure cooking technique. Buckle up, because we’re about to explore the fascinating science that makes this appliance a true culinary game-changer.
Get ready to have your mind blown as we uncover the question of "how does instant pot work?" Trust me, once you understand how the Instant Pot works, you’ll be whipping up delicious meals in no time flat. Let’s dig in!
Jump to:
What Is an Instant Pot?
The Instant Pot has taken kitchens by storm. This magical appliance is like having a genie in your kitchen, ready to grant your culinary wishes with the push of a button. It’s a pressure cooker, slow cooker, rice cooker, steamer, and yogurt maker all rolled into one sleek package.
The Instant Pot's ability to pressure cook offers a variety of functions, including cooking rice, meats, and stews with more control and customization than its smart program settings. This feature uses the power of cooking under pressure to whip up meals in a fraction of the time traditional methods take.
Imagine tender pulled pork ready in an hour instead of five, or a creamy chicken curry in just 10 minutes and your guests licking their lips after every delicious meal. It’s like having a personal chef that never takes a day off.
How the Electric Pressure Cooker Works
The main thing to remember is that most of these functions cook the food in a pressurized environment inside the pot - either on a HIGH or LOW setting - for a set amount of time.
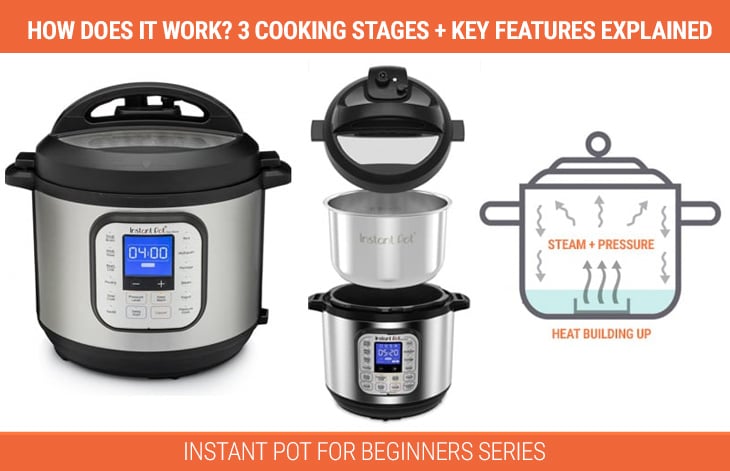
To put it very simply, when you select one of the functions, the Instant Pot will go through 3 stages of cooking:
- First, it will heat up and build up the pressure inside the pot - pre-heating & pressurizing stage.
- It will then maintain that heat and pressure for a set number of minutes set by you or by the selected program setting - cooking stage.
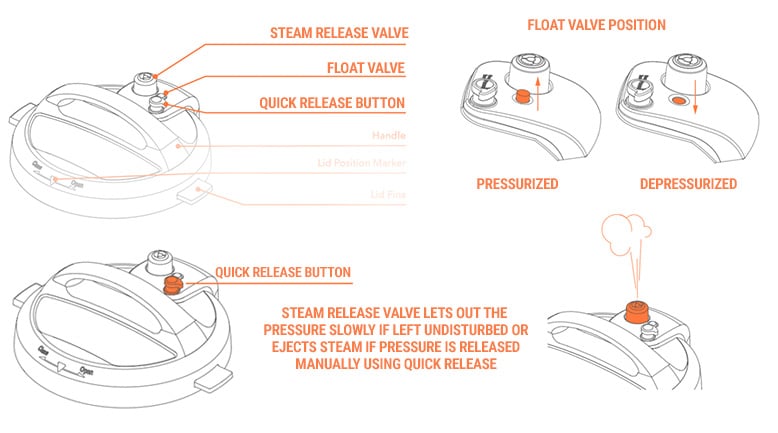
- Once the timer is done, the heat will cool down and the pressure will start to release naturally if you leave the pot undisturbed (this is called Natural Pressure Release) or you can release the pressure manually (known as Quick Release). This is the depressurizing stage.
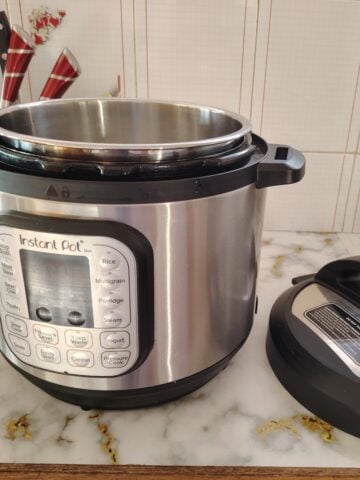
Inner Working Components of an Instant Pot
So what makes the Instant Pot tick? Let's take a peek under the lid:
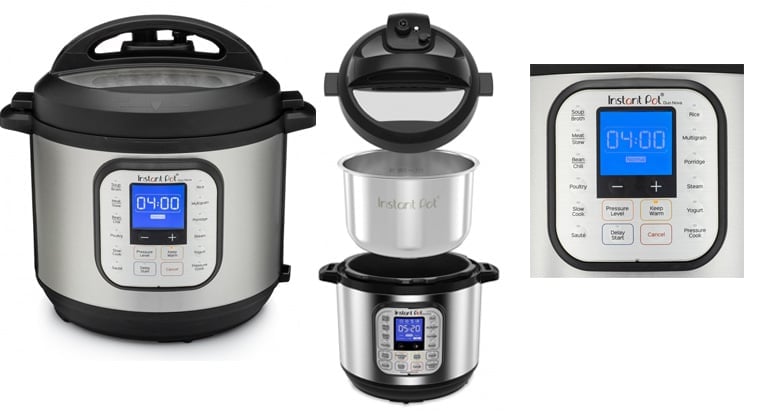
- Inner Pot: This is where the magic happens. The inner pot is made of stainless steel and is removable for easy cleaning.
- Outer Pot: This houses the heating element that brings the heat to get that cookin' done.
- Lid: The lid seals the pot and builds that all-important pressure. It's equipped with a steam release valve and a float valve (more on those later).
- Control Panel: This is the brains of the operation, where you select your cooking function and adjust settings with the touch of a button.
Pressure Cooking Process
Here’s how the Instant Pot pressure cooks your food to perfection:
- You add your ingredients and liquid to the inner pot and secure the lid. It's crucial to understand that pressure cooking requires liquid to function properly, emphasizing the importance of adding at least a cup of liquid to ensure the process works as intended. This liquid can be water, stock, tomato sauce, juice, wine, or even liquids released from the food itself during cooking.
- As the pot heats up, pressure builds inside until it reaches the perfect level (usually 10-12 psi).
- At high pressure, the boiling point of water increases from 212°F to around 239°F. This higher temperature, combined with the steam pressure, cooks food faster and more evenly.
- Once cooking is complete, the pressure is released through the steam release valve before you can safely open the lid and enjoy your meal.
I remember the first time I used my Instant Pot to make a pot roast. I was skeptical that it could really cook a tough cut of meat to tender perfection in just over an hour. But when I opened that lid and saw the juicy, fall-apart roast, I was an Instant Pot convert for life.
Safety Features
Now, if the idea of electric pressure cookers makes you nervous, fear not. The Instant Pot has more safety features than a helicopter parent at the playground. It has 10 proven safety mechanisms, like automatic pressure control, a lid lock system, and overheat protection.
It's even gotten the seal of approval (aka UL certification) for its safety measures. So go ahead and cook with confidence knowing the Instant Pot has your back. It's like having a guardian angel watching over your meal.
Instant Pot Functions and Cooking Options
The Instant Pot isn't a one-trick pony. Oh no, this versatile little appliance can wear many hats in the kitchen. Check the features below:
Pressure Cooking
Of course, pressure cooking is the Instant Pot's claim to fame. It can cook foods that usually take hours in a fraction of the time. Most models offer both high and low-pressure settings. High pressure is perfect for tough cuts of meat, dried beans, and hearty grains. Low pressure is more gentle for delicate foods like fish and tender veggies.
See these recipes: Fish & Seafood Instant Pot Recipes Collection
Slow Cooking
But wait, there's more. The Instant Pot can also moonlight as a slow cooker. Just select the slow cook function and let it work its magic. Slow cooking is great for breaking down tough cuts of meat into melt-in-your-mouth deliciousness. Stews, soups, and chilis are slow cooker superstars.
See these reicpes: Best Instant Pot Stews
Rice Cooking
Put away that old rice cooker, the Instant Pot has got you covered. Many models have dedicated rice programs that make perfect rice at the touch of a button. From fluffy jasmine rice to chewy brown rice, the Instant Pot can do it all. And no more worrying about boil-overs or burnt bottoms.
Yogurt Making
Yes, you read that right. The Instant Pot can even make yogurt. Some models have a yogurt function that pasteurizes milk and keeps it at the perfect temperature for culturing. Homemade yogurt has never been easier. Just add your milk and starter culture, press the yogurt button, and let the Instant Pot work its fermentation magic.
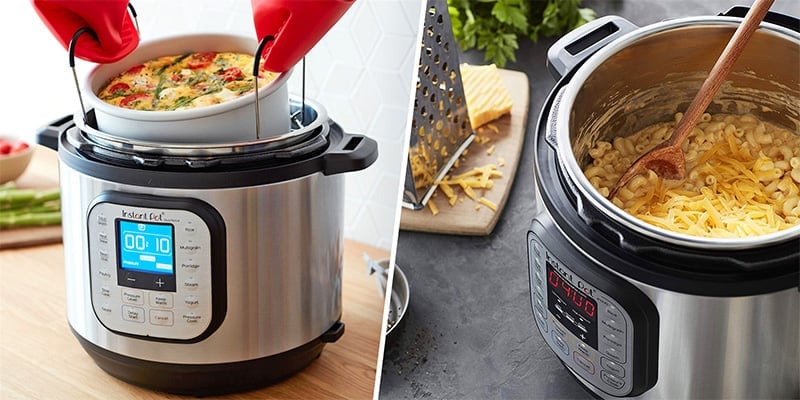
Sautéing and Browning
Before pressure cooking, you can use the sauté function to brown meats and sauté veggies right in the inner pot. This builds flavor and adds depth to your dishes. No more dirtying extra pans or juggling multiple appliances. Instant Pots are truly a one-pot wonder. From hard-boiled eggs to cheesecake (yes, really.), the Instant Pots cooking options are endless.
It's like having a sous chef who never takes a sick day and always follows orders. So there you have it, the Instant Pot demystified. With its multitasking abilities and foolproof features, it's no wonder this appliance has become a kitchen staple.
Instant Pot Models and Accessories
Instant Pot has taken kitchens by storm, and for good reason. These electric pressure cookers are game-changers. But with so many Instant Pot models out there, which one should you choose?
Popular Instant Pot Models
The Instant Pot Duo is their most basic model, offering 7 cooking functions. If you want more bells and whistles, the Duo Plus and Pro models add sous vide and sterilizer options. For air frying fans, the Instant Pot Duo Crisp is a dream, with a special lid for air frying, roasting, baking, broiling, and dehydrating. Trust me, homemade potato chips in the Duo Crisp are life-changing.
Essential Instant Pot Accessories
While your Instant Pot comes with the basics, some accessories can really change up cooking food. A silicone steamer basket is a clutch for perfectly steamed veggies every time. For making cheesecake or egg bites, you'll want a 6-inch springform pan. And don't forget extra sealing rings - I like to have one for savory dishes and one for sweet.
With the right pressure cooker model and a few key accessories, you'll be cooking up a storm in no time. From tender pulled pork to fluffy rice to creamy yogurt, the possibilities are endless. Get ready to fall in love with the features of Instant Pots!
What affects Pressurizing Time?
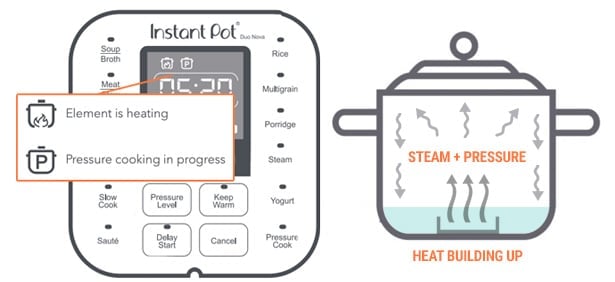
The pre-heating and pressurizing stage is something many Instant Pot recipes don’t mention in the time required for cooking. The Instant Pot must come to pressure before the timer begins counting down, and the time it takes depends on a few factors.
First, the amount of liquid. For example, cooking food with one cup of water should only take a few minutes to come to pressure. On the other hand, a large pot of soup reaching the maximum fill line may take 20-30 minutes to come to pressure.
Another factor to consider is the temperature of the contents of the pot. If you begin the recipe by sauteing your contents and heating up the liquid, it will come to pressure more quickly than cold water. On average, it will take 10-15 minutes to come to pressure. This is important to know so you can better plan how long your meal will actually take to cook.
While this stage is often thought to precede cooking, it is actually where cooking begins. For example, in the case of delicate items such as broccoli or cauliflower, bringing the pot to pressure is the only cooking that needs to be done.
Tips for Using Your Instant Pot
So you've got your shiny new Instant Pot... now what? Don't let all those buttons intimidate you. With a few key tips, you'll be an Instant Pot pro in no time:
Understanding Pressure Release Methods
One crucial thing to master is pressure release. There are two methods: natural release and quick release. Natural release means letting the pot depressurize on its own, which can take 10-30 minutes. It's best for foamy foods, big cuts of meat, or recipes with lots of liquid.
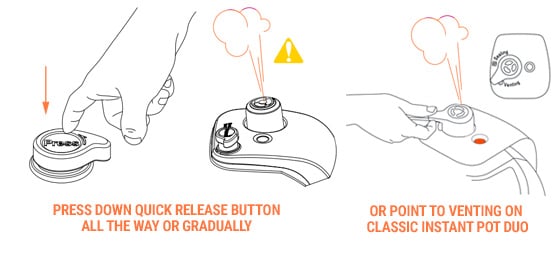
Quick release involves manually turning the valve to vent the steam ASAP. It's great for quick-cooking veggies and delicate foods. Just be careful of that steam.
Cooking Times and Pressure Levels
Instant Pot cooking times can vary a lot from traditional methods. Most recipes are developed for high pressure but always double-check. Cooking times may need to be increased for large cuts of meat, frozen foods, or high altitudes. When in doubt, set the timer a few minutes less - you can always add more time, but you can't undo overcooked food.
Using the Keep Warm Function
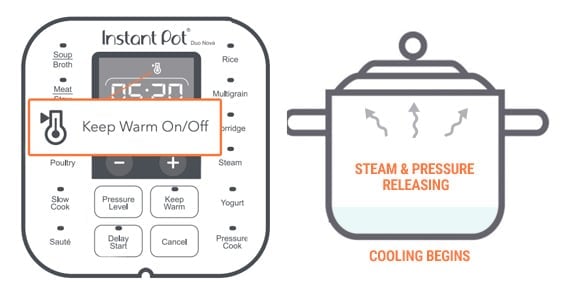
The "Keep Warm" function is a lifesaver when dinner is ready but you're not. It will maintain a safe temperature until you're ready to eat. Just be aware that food shouldn't be kept on warm for more than a few hours, for the best taste and texture.
Cooking Perfect Rice and Eggs
Two things the Instant Pot excels at? Rice and eggs. For rice, use a 1:1 ratio of rice to water, select the Rice function, and allow a 10-minute natural release after cooking. For hard-boiled eggs, the 5-5-5 method is foolproof. 5 minutes high pressure, 5 minutes natural release, 5 minutes ice bath.
You'll get easy-to-peel eggs with creamy yolks every time. With these tips in your back pocket, you're well on your way to Instant Pot mastery. Get ready for tender meats, fluffy grains, and rich stews in a fraction of the time. Happy pressure cooking.
FAQ's
Yes, Instant Pot is designed with safety features such as pressure regulators, safety valves, and lid-locking mechanisms to prevent accidents. However, it's essential to follow the manufacturer's instructions and use caution when handling hot components.
Yes, you can cook frozen food in an Instant Pot. The pressure cooking function is especially useful for cooking frozen meats and vegetables quickly. However, it's essential to adjust cooking times accordingly and ensure that frozen food is evenly distributed in the pot to prevent uneven cooking.
The timer function allows you to delay the start of cooking for a specified period. You can set the timer to start cooking at a later time, which is useful for meal planning or preparing dishes ahead of time. Simply set the desired delay time before selecting the cooking function.
No, it's not safe to use an Instant Pot without the lid. The lid is essential for creating a sealed environment necessary for pressure cooking and maintaining safety during operation. Using the Instant Pot without the lid could result in improper cooking, loss of pressure, or steam-related accidents.
Conclusion
So there you have it - the secrets of the Instant Pot revealed! This incredible kitchen gadget harnesses the power of pressure to cook your food faster while locking in all the flavors and nutrients. With its multiple safety features and foolproof design, the Instant Pot takes the guesswork out of pressure cooking.
With your newfound understanding of the Instant Pot, you're ready to create culinary wonders. Pick out the ingredients that inspire you most. Turn on your pressure cooker and let it work its magic. Savor the delightful results of your pressure cooking endeavors!


Irene Harrison
What is happening when the word BURN shows?
Instant Pot Eats
Check out this blog post: https://instantpoteats.com/instant-pot-burn-message-what-causes-it-how-to-fix-it/
Rita
I put my meat inside the pot and put the Meat/Stew on. Put in 2 c water. It pressurized and after what seemed like
a few minutes LOL 2 came on. That then increased in minutes. What is LOL?