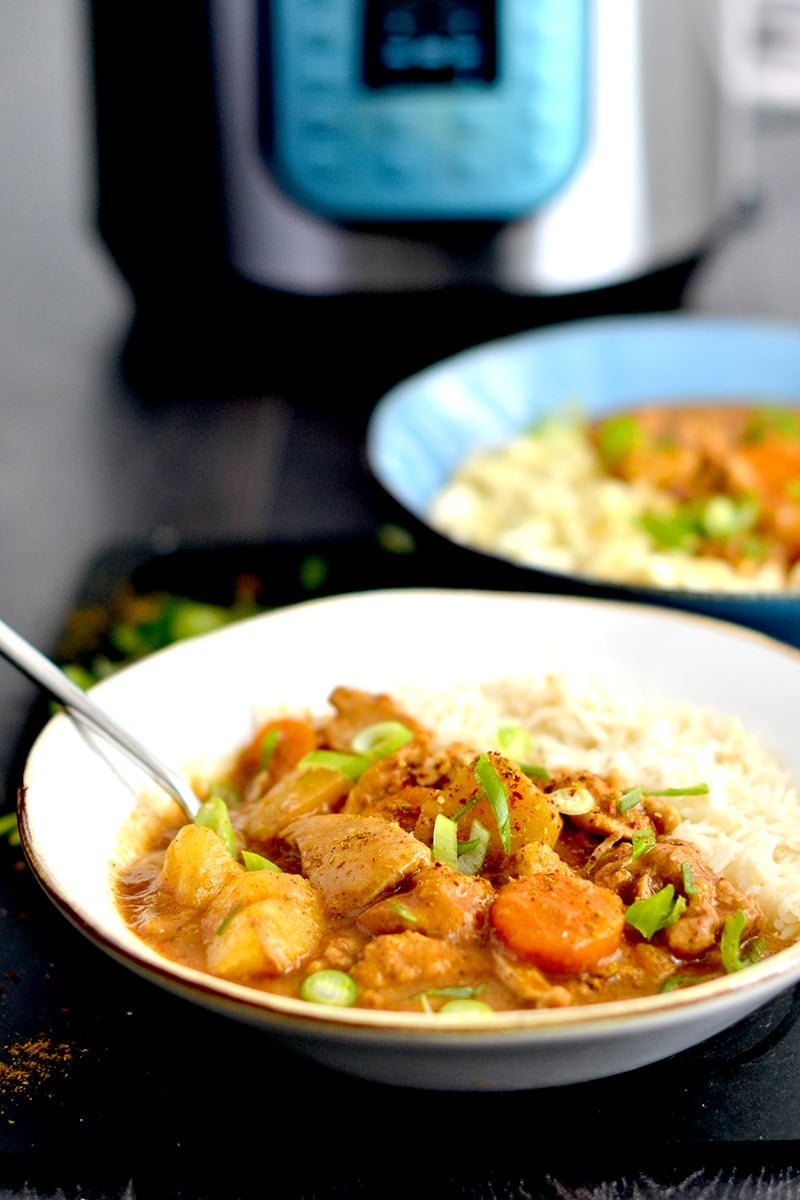
Learn how to make Instant Pot Japanese curry the whole family will love. This simple homemade recipe is made from scratch rather using ready-made boxed curry and is super delicious. We used chicken, carrots and potatoes but you can make a vegetarian/vegan version as well. We've provided instructions below.

What Is Japanese Curry?
Japanese curry is one of the most popular dishes in Japan and is enjoyed in many countries around the world. It can be made with a variety of meats and vegetable but the key is its thick, gravy-like curry sauce. And, Japanese curry comes with a lot of sauce! The flavour is a crossover of Japanese, Indian and Western cuisines.
Many people resort to store-bought curry sauce out of the box (e.g. Golden Curry) but it’s quite easy to make from scratch at home. It will be much healthier and all of the ingredients are usually easily available at the supermarket. This sauce is sometimes poured over breaded pork or chicken cutlets (katsu).
Our curry recipe is based on a few traditional recipes and the ingredients that often go into the commercial sauce.
Vegetarian & Vegan Curry
This Japanese curry recipe is made with chicken but you can easily turn it into a vegetarian and vegan version. Use 2 cans of rinsed chickpeas instead of chicken and vegetable stock. The rest of the ingredients are pretty much the same (feel free to add more potatoes or carrots).
You can also add a cup of frozen peas for extra protein and colour. The cooking time will remain the same BUT you don’t need to do 15 minutes of natural release. You can perform a quick release to let off the pressure once the cooking timer stops. Then follow the steps as described.
How To Make Instant Pot Japanese Curry
For this recipe, we are using free-range, skinless chicken thighs. You will need to cut them into bite-size pieces, somewhere between 6-8 pieces from each thigh. Chicken breast or various diced chicken can be used. Turkey and pork meat would also work well in this curry. Season with a little salt and pepper. If not using chicken, prepare chickpeas, beans, peas or whatever you like.

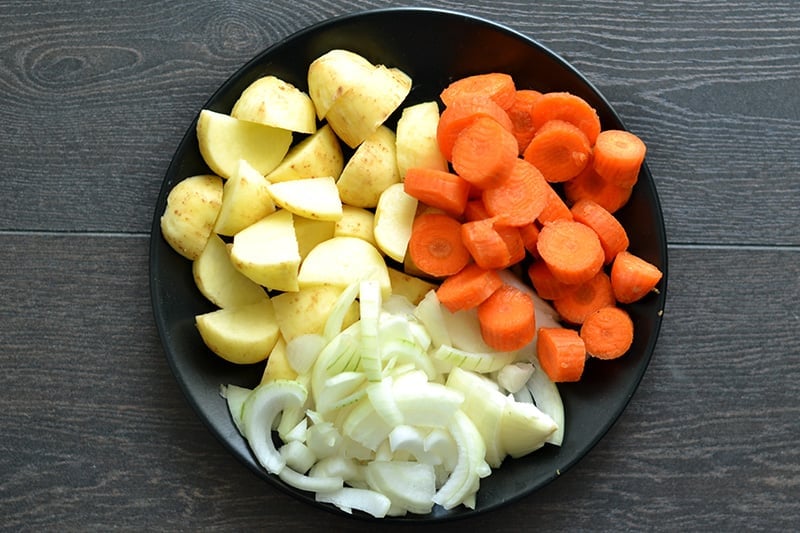
Cut up the onions, potatoes and carrots. I used baby potatoes in our recipe.
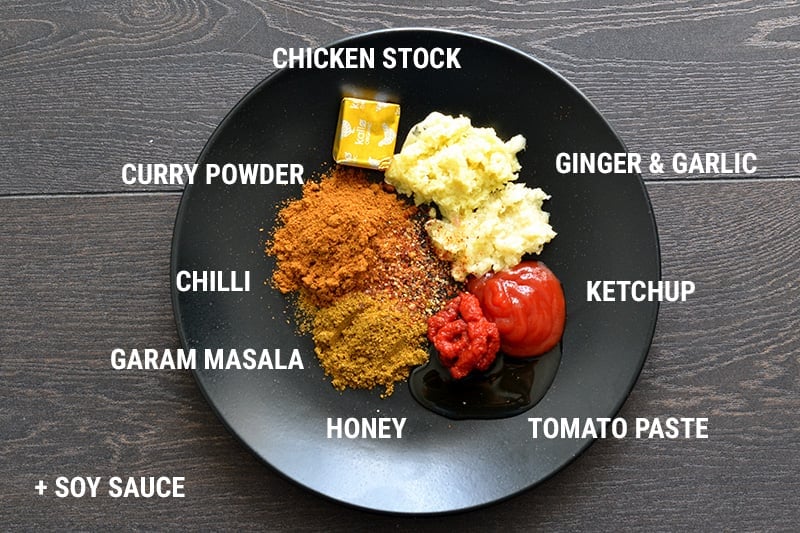
Here is what we used to flavour our curry: fresh ginger and garlic (it does work best with the fresh stuff but you could use powders if needed), mild curry powder, garam masala (Indian spice blend), chili powder or cayenne pepper, ketchup, tomato paste, a little honey, plus soy sauce and chicken stock (swap for vegetable stock).
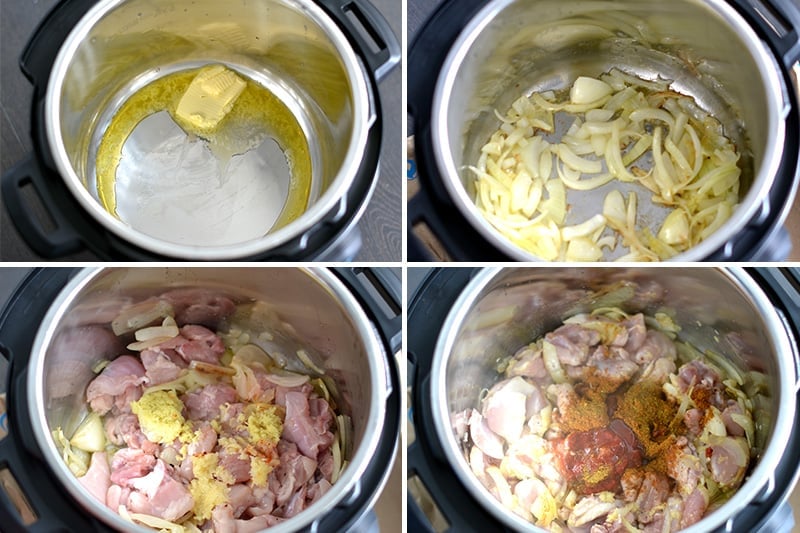
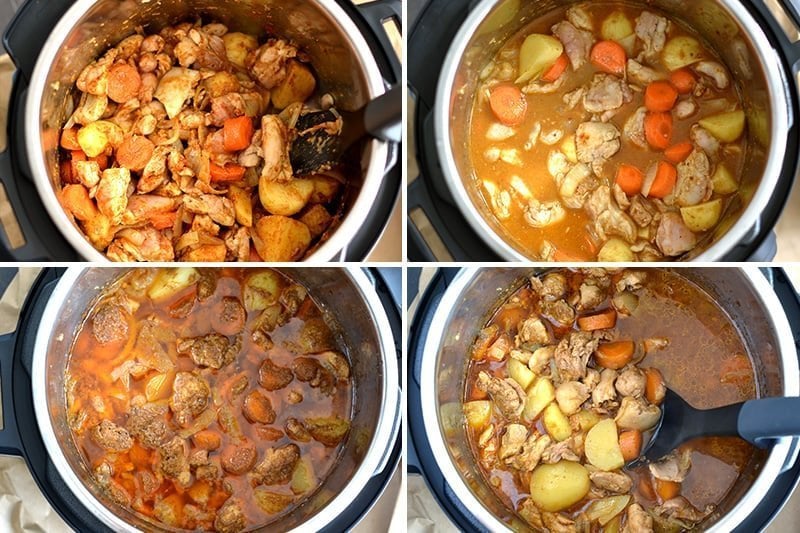
STEP 1. First, you will need to sauté the onions in some butter (or dairy-free alternative). Then you add the chicken, veggies and our flavourings.
STEP 2. Stir everything through and add the stock. The lid goes on and the curry will have to cook for 10 minutes at HIGH pressure. Once cooked, the meat and potatoes should be nice and soft (see full timings in the instructions below). It might seem like there is a lot of broth liquid. Don’t worry! We’re about to thicken it into the most delicious gravy.
How To Thicken The Curry
Okay, this is the crucial part and this is what gives a Japanese curry its velvety texture and body. Using a ladle, scoop about 1-2 cups of the broth into a bowl or a blender. We’re going to make a cheat’s roux (thick flour mixture) that will thicken our gravy. Add the flour to this bowl and either whisk it vigorously or process in a blender for 5-10 seconds, which is what I did.

The flour is starchy and will thicken the broth. The main thing is to avoid any lumps, that’s why blending might work better than whisking. We’re going to add more soy sauce and tomato paste to this roux and then stir it back into our curry. That’s when the magic happens and the curry suddenly thickens. Have a taste and add a little more salt if you need. It’s now ready to serve!

What To Serve With Japanese Curry
This curry deserves a simple side dish that will easily absorb all that delicious gravy. Regular rice, brown rice, or quinoa will work well and if you want a lower-carb version, try serving this curry with cauliflower rice instead. It’s delicious and the crunch works well with the soft potatoes and carrots. You can also serve this curry with some crusty bread or naan bread to mop up the sauce.

MORE CURRY RECIPES YOU WILl LOVE
- Indian Chicken Curry & Rice
- Thai Chicken Curry
- Goan Shrimp Curry
- Even more curry recipes here
- For more Instant Pot Chicken Thigh Recipes go here.
Full Recipe
Find the full list of ingredients, instructions, and a nutritional breakdown below. If you have questions or cook this recipe, please let us know in the comments, and make sure to rate this recipe so it’s easy for others to find.

Rate This Recipe
Instant Pot Japanese Curry
Equipment
- 1 6-quart Instant Pot Duo this is what we used
Ingredients
- 1 tablespoon butter or dairy-free alternative (20 g)
- 1 large onion quartered and sliced
- ¼ teaspoon salt
- 1.3 lbs. chicken thighs 6 thighs cut into 6-8 pieces each (600 g)
- 1 tablespoon grated ginger
- 2 cloves of garlic minced
- 2.5 tablespoons mild curry powder
- 2 tablespoons garam masala powder
- ¼ teaspoon chili flakes or cayenne pepper
- 1 tablespoon tomato paste
- 1 tablespoon ketchup
- 2 tablespoons soy sauce or gluten-free Tamari sauce
- 1 teaspoon honey or brown sugar
- 2 medium carrots sliced into thick circles
- 4 baby potatoes quartered
- 2 cups water
- 1 cube chicken stock or use 2 cups ready-made stock of choice
For the flour gravy roux:
- 5 tablespoons plain flour or gluten-free flour
- 1 tablespoon ketchup
- 1 tablespoon tomato paste
- 2 tablespoons soy sauce
- Salt and pepper for seasoning
- Garnish with: fresh cilantro and spring onions
- Serve with: white rice or/and cauliflower rice
Instructions
- Turn the Instant Pot on and press the Sauté button, allow the pot to heat up slightly. Add the butter and once melted, the onions and ¼ teaspoon salt. Cook together for 4-5 minutes, stirring a couple of times.
- Once the onions start to turn golden, add the chicken, ginger and garlic and stir all together.
- Now add the rest of the ingredients except for the water/stock. Stir through for 30 seconds, allowing the spices to release their aromas. Press Cancel to turn the Instant Pot off.
- Add the water and the stock cube and stir everything really well together. Pop the lid on top, lock and make sure the top valve is pointing to Sealing. Press Pressure Cook (Manual on older models), HIGH pressure and set the timer to 10 minutes. After 3 beeps, the Instant Pot will start building up the pressure and you will see ‘ON’ on display. The pressure will take about 5-10 minutes to build up and then the 10-minute timer will begin and display on the screen.
- Once the 10 minutes are up, allow the pressure to release naturally for 15 minutes, then use the quick release to let off the rest of the steam.
- Once the pressure is completely released, you can open the lid. You can keep the Instant Pot on Keep Warm setting for now. Stir the curry and using a ladle, scoop 1-2 cups of the broth into a bowl or a blender. We’re now going to make the gravy roux that will thicken the sauce.
- Add the flour to this bowl and either whisk it vigourosly or process the mixture in a blender for 5-10 seconds, which is what I did. The flour is starchy and will thicken the broth. Try to avoid any lumps, that’s why blending might work better than whisking. Now, add the extra ketchup, tomato paste, and soy sauce and whisk the sauce.
- Stir this gravy roux back into our curry. That’s when the magic happens and the curry should thicken. Have a taste and add a little more salt if you need. It’s now ready to serve with rice, quinoa, or cauliflower rice.
Notes
Nutrition


David
Great recipe.
I am going on a boat trip and I am trying to learn how to do one pot cooking from a stovetop pressure cooker. On my first go your recipe worked very well and was very nice.
Thanks
Spencer
This recipe goes really well with pork tenderloin instead of chicken. Very tasty, easy to make. If you are having problems with how spicy it is, half the garam masala (I use Chinese Five Spice) and make sure you get Japanese Mild Curry Powder, the end result is a much sweeter and far less spicy curry.
Instant Pot Eats
Thanks, Spencer. It absolutely works with pork and I have also made it with beef once. Love your tips for spice substitutions, too. Thank you!
Gina
So is the total amount of Soy Sauce and Tomato Paste 4 tbsp? IT says it twice but i wasn't sure if it was just listed twice
instantpoteats
Yes, that's correct. We add half of those ingredients into the cooking broth and half into the finishing flour mix, so the total would be 4 tbsp soy sauce, 2 tbsp ketchup and 2 tbsp tomato paste (in ingredients they separated into 2 cooking stages). Hope that helps!
IPE team
Lisa
I made this tonight. It’s pretty spicy…in fact a little too spicy for me although my son thought it was just fine. For the sauce, I added the flour, ketchup, soy sauce, and tomato paste together. Then, I added about a half cup of cold water and whisked it into a paste. Adding cold water instead of the hot liquid will ensure that there are no lumps. Then you can add it back to the instant pot It tastes like an Indian dish for sure. We served over white rice
Lisa
I made this tonight. It's pretty spicy...in fact a little too spicy for me although my son thought it was just fine. For the sauce, I added the flour, ketchup, soy sauce, and tomato paste together. Then, I added about a half cup of cold water and whisked it into a paste. Adding cold water instead of the hot liquid will ensure that there are no lumps. Then you can add it back to the blender. It tastes like an Indian dish for sure. We served over white rice
Alison
Loved this recipe! It was really easy to follow and the curry tasted very authentic and similar to the ones I've tried in restaurants but with more of a homemade flavor to it. We added some frozen green beans to the curry and had it with brown rice. Will be making again 🙂
instantpoteats
Thanks, Alison. Glad you liked it 🙂
Kathleen
Doesn't say how much garlic and ginger.
instantpoteats
Oops! Both have been added to ingredients. We had it in the pic but accidentally forgot it in the ingredients list. Thanks for the heads up!