When it comes to recipes using ground beef, this is the best Instant Pot Taco Meat and should be every household's staple. It's affordable, freezer-friendly and super versatile with different ways you can use up the leftovers. We'll show you how to make very delicious spiced ground meat that you can do during meal prep or enjoy in tacos, burritos, nachos, enchiladas, pasta and rice dishes.
Instant Pot Taco Meat
Just in case you live somewhere with a distinct lack of Mexican or Tex-Mex eateries and you're not familiar with the concept of taco meat, let us make quick introductions.
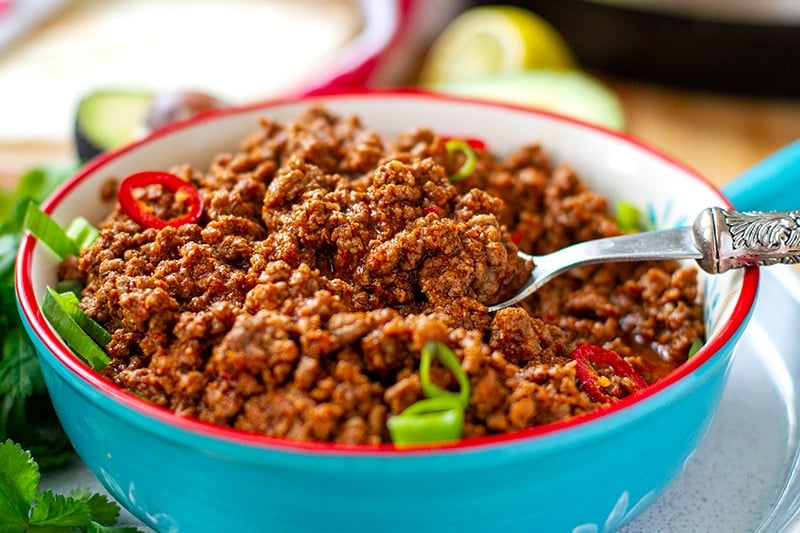
Taco meat is made from ground beef (not too lean to preserve some flavor and keep it juicy) that has been fried with a mix of spices, chili, garlic and tomatoes or tomato sauce.
The meat is fried and braised until the broth it's cooking in is thickened into a gravy. This gravy coats the meat and gives it lots of flavor and shine. Taco meat shouldn't be too dry but it's not a meat sauce either. It needs to be stiff enough to stay in a taco and hold well inside an enchilada.
Well-seasoned taco meat makes the perfect protein base for many dishes such as tacos, burritos, nachos, quesadillas, enchiladas, rice casseroles, salads and wraps.
By adding more broth and tomatoes to taco meat, you can turn it into a pasta sauce. Check out 11 ways to use up leftover taco meat here.
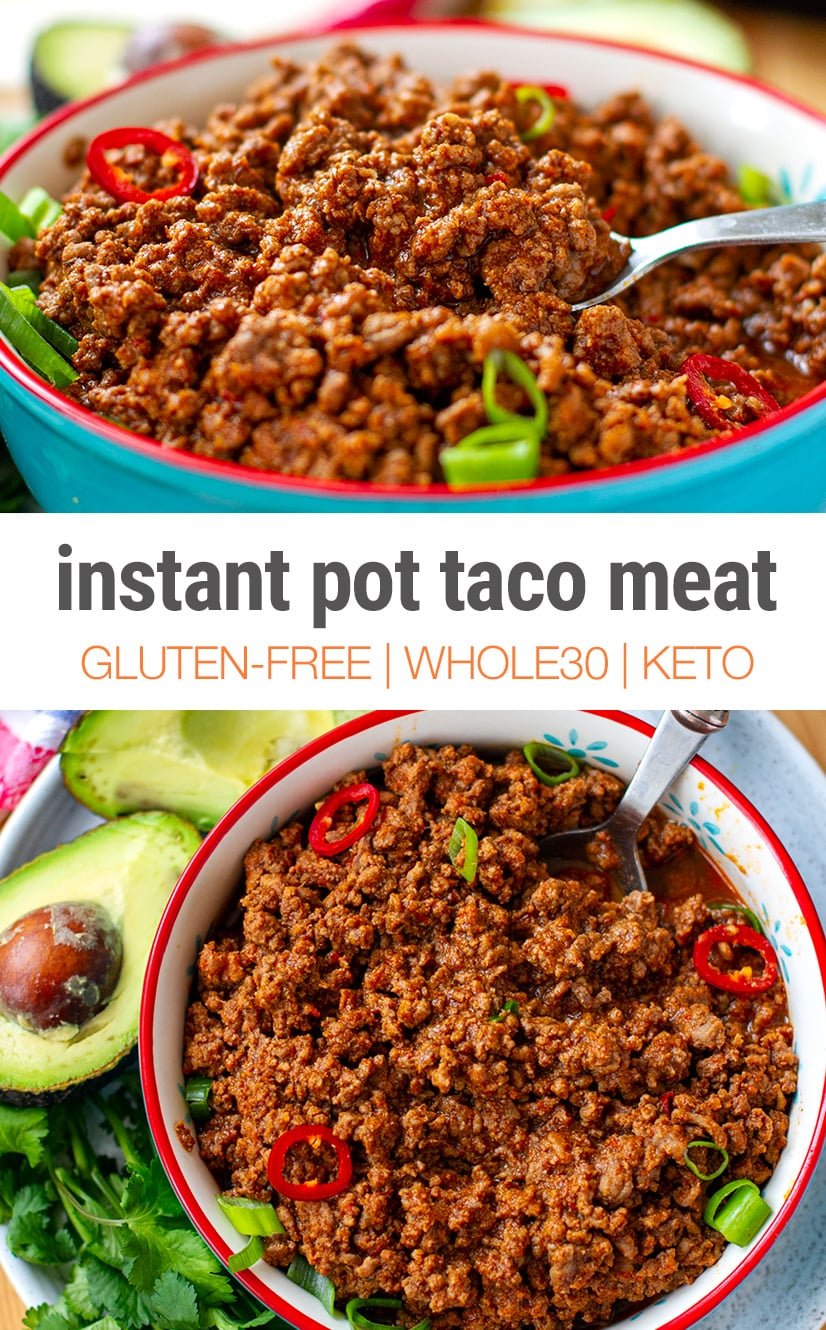
This Instant Pot Taco meat is nutritious (check out nutrients below) and our recipe is gluten-free, paleo, Whole30 and keto-friendly.
How To Season Taco Meat
Taco meat has two key parts to it: ground beef and spice seasoning mix.
Better quality beef will give you more flavorful taco meat. If you're counting calories, getting leaner ground beef might save you a few but to get the juiciest results, look for ground meat with 5-10% fat.
The second key element is the taco seasoning which consists of different spices and herbs such as cumin, coriander seed, paprika, chili and dried oregano. There are many variations, of course, but these are the more accessible spices that we used in our recipe. Aromatics such as onion and garlic are often used for more flavor.
There are many ready-made taco seasoning options and pre-mixed blends. Feel free to use those, we noted the required amounts in the recipe below.
How To Cook Taco meat In Instant Pot
Cooking taco meat in Instant Pot is easy and allows you to lock in all those nutrients and flavors during pressure cooking.
The meat is first cooked on HIGH pressure and then thickened into stiffer consistency using the Saute function of the Instant Pot. Everything is done in one pot, which is easy to clean up afterwards.
Here are the basic steps and you will find the full list of ingredients, instructions and nutritional breakdown in the recipe card below. You can use a 6-quart or 8-quart Instant Pot model.
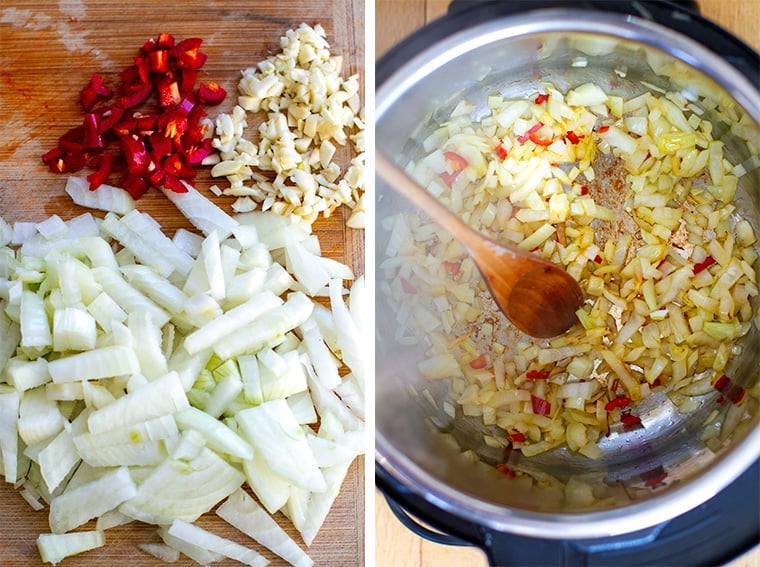
- Step 1. Dice onions, garlic and red jalapeno chili. Cook on Saute function in a little oil until just softened.
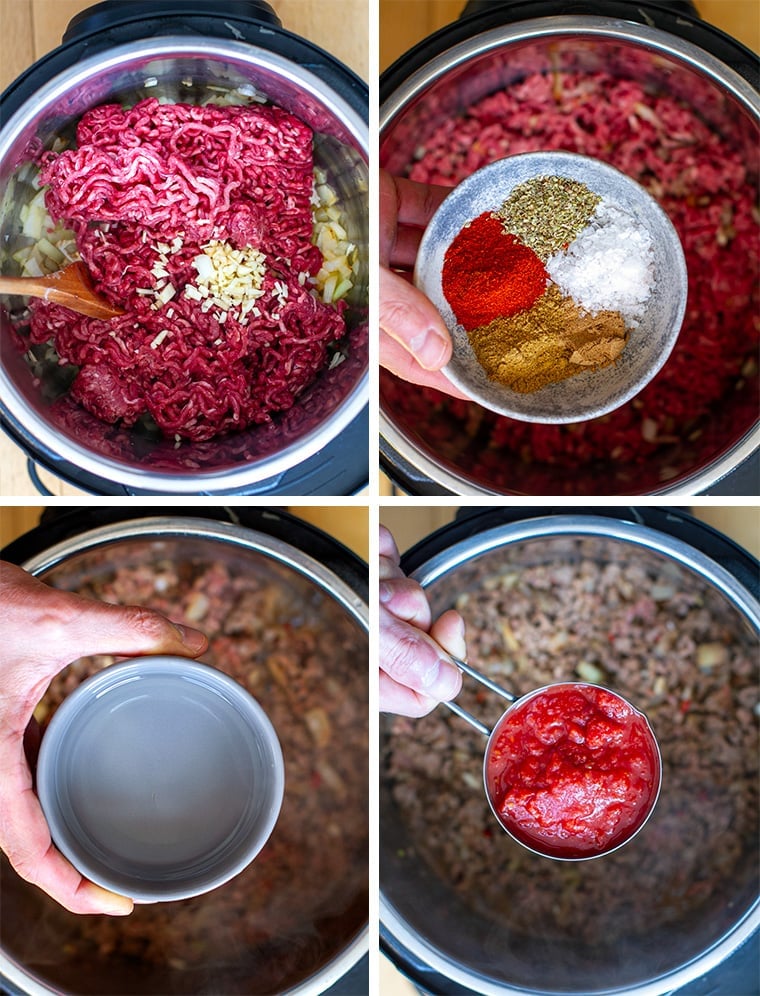
- Step 2. Add ground beef meat and taco seasoning spices and cook together briefly. Still on Saute at this point.
- Step 3. Add ⅔ cup of water (you could also use stock or bone broth). At this point, you can turn the Saute function off. It's very important to stir the water through the mix and use a spatula to scrape the bottom of the bottom to make sure nothing is stuck. This will prevent the really annoying BURN error that can happen if anything is burnt during the Saute stage.
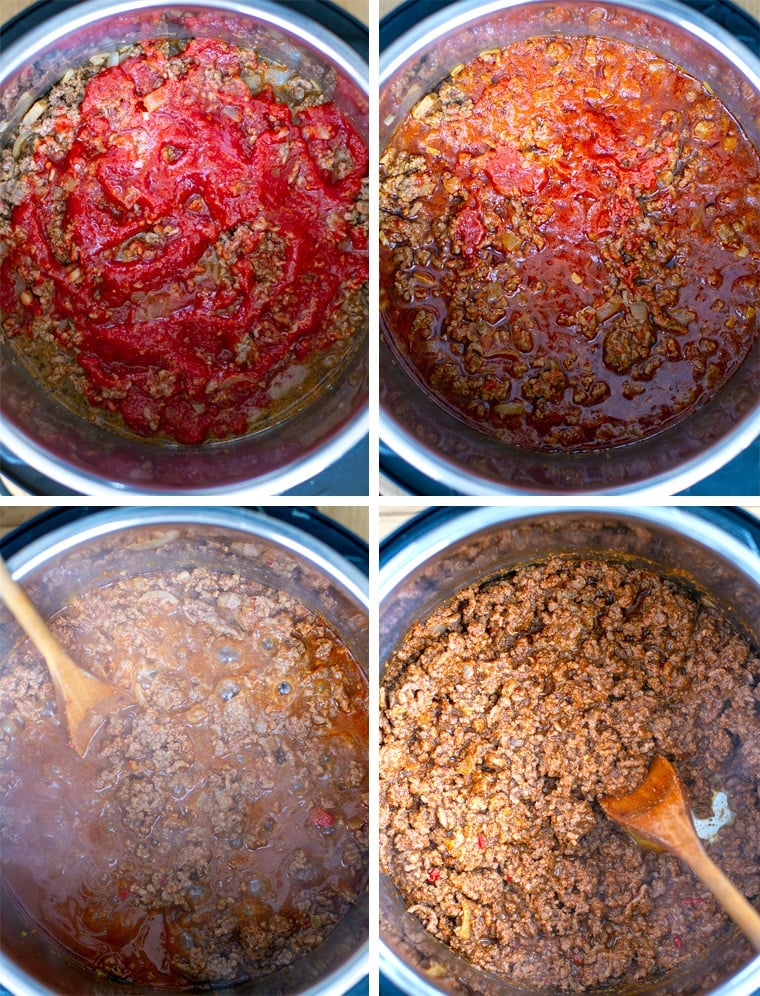
- Step 4. Add the crushed tinned tomatoes BUT do not mix, just spread! Tomato sauce has a tendency to thicken and caramelise during cooking, which in newer models of Instant Pot can cause the BURN error.
- Step 5. Pop the lid on top and pressure cook on HIGH for 10 minutes with 5-10 minutes of natural pressure release.
- Step 6. Once you've released the remaining pressure and opened the lid, the taco will look more like meat sauce. At this point, stir it through and set the Instant Pot to Saute function again.
- Step 7. The final step is to thicken the sauce into gravy, which will stiffen our taco meat. Sauteeing will allow the mixture to come to bubbling, which combined with frequent stirring, will evaporate much of the excess liquid.
- Depending on how stiff or thick you want the taco meat to be, this can take anywhere between 5-10 minutes. We did ours for about 8 minutes. Make sure to stir frequently!
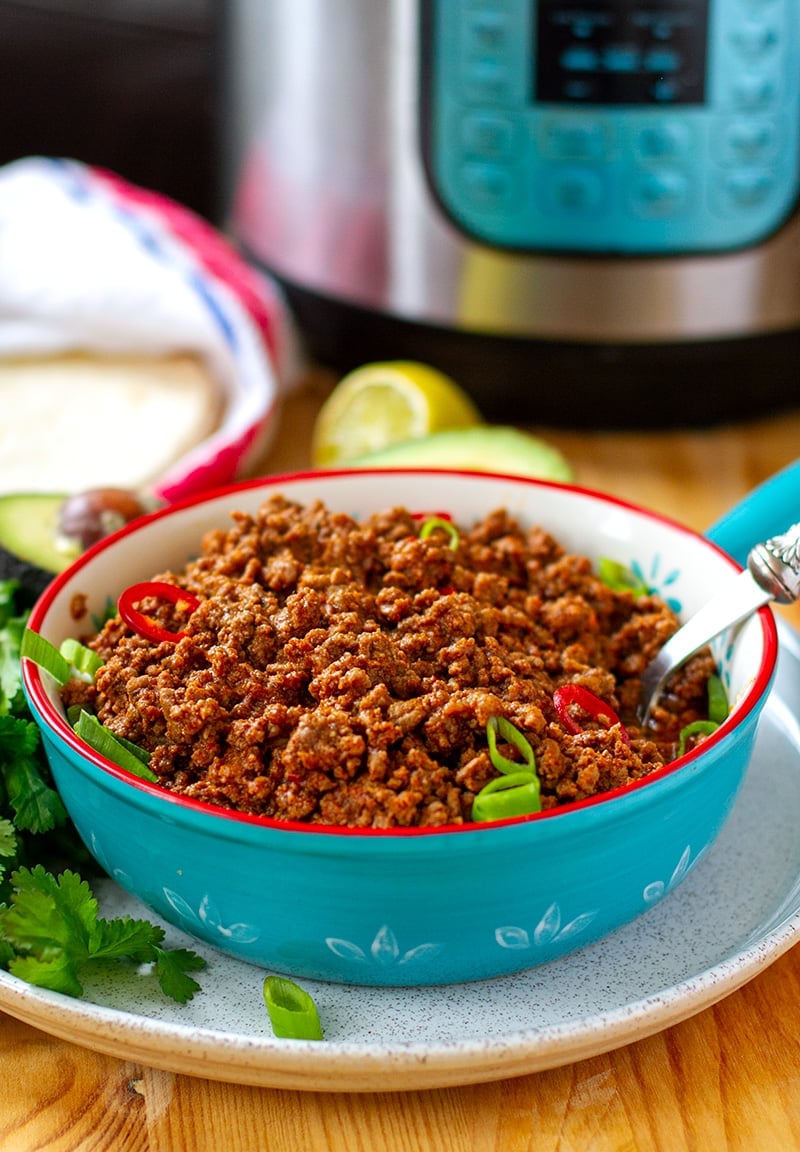
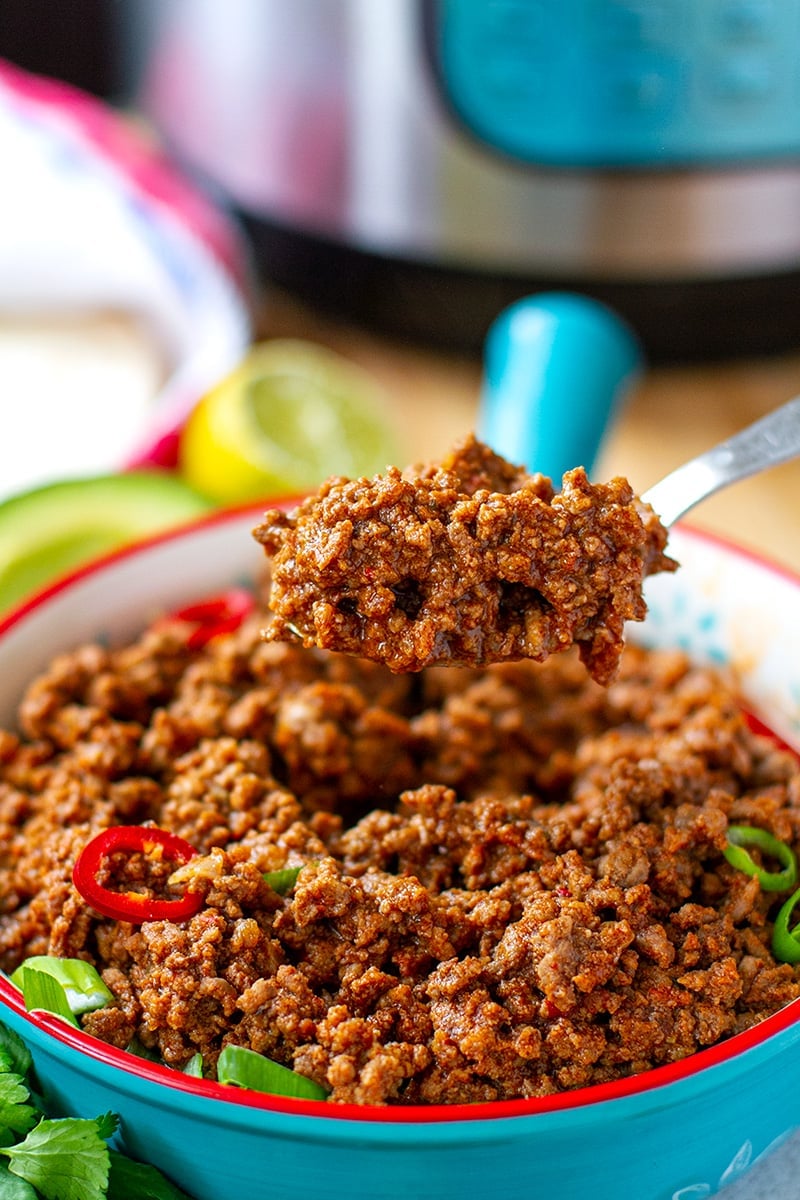
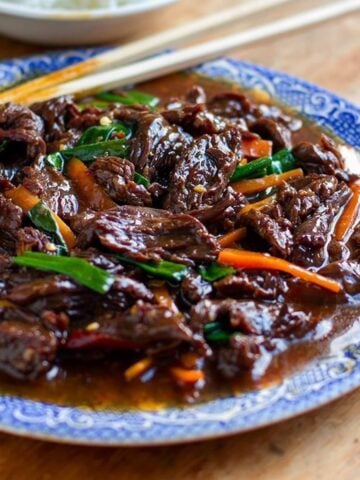
Look at how rich and shiny this taco meat looks! Are you ready to tuck in? We served it with a few chili slices, scallions and cilantro. We did simple tacos with avocado, lime and cheese on the side. You can add salsa, corn, beans, rice or whatever you like, see some ideas below.
More Tex Mex Recipes Here
- 20+ Mexican-Inspired Instant Pot Recipes
- Ground Beef & Rice Burritos
- Veggie Rice, Corn & Bean Burrito Bowls
- BBQ Chicken Tacos With Pineapple Salsa
- Mexican Bean Salad With Instant Pot
- 20 Instant Pot Taco Recipes
Full Recipe
Find the full list of ingredients, instructions, and a nutritional breakdown below. If you have questions or cook this recipe, please let us know in the comments, and make sure to rate this recipe so it’s easy for others to find.

Rate This Recipe
Instant Pot Taco Meat
Ingredients
- 2 tablespoons olive oil
- 1 medium onion finely diced
- ½ Serrano pepper or jalapeño pepper, diced
- 1.8 lbs. ground beef 800 g, lean (90-95%)
- 5 cloves garlic diced
- 2 teaspoons salt
- 1 teaspoon ground coriander seed
- 2 teaspoons ground cumin
- 2 teaspoons paprika
- 1 teaspoon dried oregano
- ⅔ cup water
- 1 cup diced tomatoes or passata
Instructions
- Turn the Instant Pot on and press the Saute function key. Add the olive oil, onions, and chili and cook for 3-4 minutes, stirring a few times, until softened and golden brown.
- Add the beef, garlic, and spice mix then cook for 2 minutes, stirring and breaking the clumps of ground beef with a spatula.
- Add the water and stir through the beef, making sure to scrape the bits off the bottom. Water will help to deglaze the bottom and anything that might be stuck, which will prevent the possibility of BURN error.
- Press Cancel to stop the Saute process. Add the tomato sauce on top and spread it evenly with a spoon. DO NOT stir the sauce into the meat but rather layer it. Sometimes, the new models of IP can be very sensitive to burning high-sugar ingredients such as tomato sauces, so for this recipe, it's best to leave it at the top of the meat.
- Set to Manual/Pressure Cook on HIGH pressure for 10 minutes. After 3 beeps, the Instant Pot will start to build up the pressure. This will take about 5-10 minutes.
- Once the timer goes off, allow 5-10 minutes for natural pressure release and then point the top valve to Venting to do a quick release. Open the lid and stir the sauce through. At this stage, it will have a lot of liquid from the meat juices so we will use the Saute function again to thicken the sauce.
- Press the Saute and cook the beef for 7-10 minutes, stirring frequently. This will allow the liquid to evaporate and the sauce to thicken to you preferred consistency.
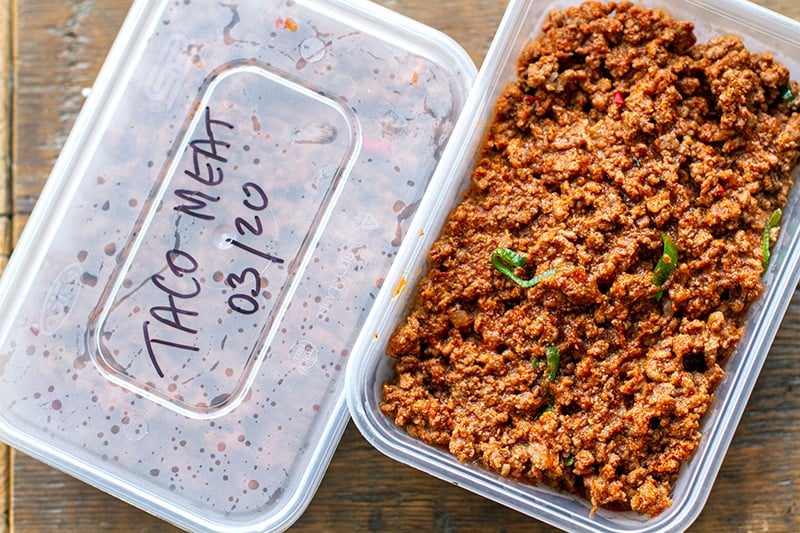
- Cool down before storing in the fridge or freezer.
Notes
- For 2 lbs. / .9 kg ground beef use 1 cup water and 1.25 cups tomatoes (salt and spices should be about the same, but taste for salt).
- For 3 lbs. / 1.3 kg ground beef, add ½ teaspoon of each spice, 2.5 teaspoons salt, 1.5 cup water and 1.5 cups tomatoes.
Nutrition
How To Store Instant Pot Taco Meat
- Divide the meat into containers (individual portions are very handy) and let it cool down. Store airtight in the fridge for up to 5 days and reheat until very hot.
- Follow the above instructions for the freezer. Label the containers and store them once cooled down completely. Freeze for up to 3 months. You can wrap them in extra plastic wrap or foil to prevent freezer burn. Defrost in the fridge overnight, in a microwave or directly in the pot over low-medium heat.
Taco Meat Frequently Asked Questions
How long is taco meat good for? How to freeze taco meat?
Taco meat will keep for 3-4 days in the refrigerator and up to 3 months in the freezer. Make sure to cool down the meat first before storing it in an airtight container or heavy-duty freezer bags. Make sure to label the containers if stored in the freezer. To use frozen taco meat, defrost it overnight in the fridge or in a microwave.
What do to with leftover taco meat?
Taco meat can be used in so many ways besides tacos. You can use it as a filling in burritos, enchiladas, quesadillas; as a topping on salads, naked burrito bowls, nachos; in sandwiches, sliders, wraps and burgers; in rice casseroles or pasta, dips, lasagna and much more. Ways To Use Leftover Taco Meat.
How many calories in taco meat?
Using our recipe, you're looking at 265 calories per 5 ounces of taco meat or 140 grams (give or take), 28 grams protein, 5.5 grams carbohydrates, 2 grams fibre, and 14.5 grams fat. The calories in taco meat will depend on the fat content of the ground beef used. We used ground beef that was 93% meat and 7% fat.
How much taco meat per person?
This really depends on what you're using taco meat for. On average, 5 ounces or 140 grams of taco meat should be enough for an adult but you can stretch it out with the addition of other things like beans, rice and corn.
How to thicken taco meat?
The easiest way to thicken taco meat is by using the evaporation method. You can do this on the stovetop or Instant Pot. Make sure to turn the heat up to bring the taco mix to bubbling. Cook on medium-high for 5-10 minutes (maybe longer if quite watery) and make sure to stir frequently, which will help to evaporate most of the excess liquid and thicken the gravy to your liking. You can also sprinkle taco meat mixture with a little flour, which will also thicken the sauce
How much taco meat for 20?
This question often comes up from people throwing together a taco party. Somewhere between 5-6 ounces / 140-150 grams of taco meat should be a sufficient amount, provided you have other taco fillings on the table such as guacamole, salsa, maybe cheese, corn or beans. Our recipe uses 1.8 lb/800 g ground beef to make about 6 servings, so for 20 people, you are looking at 3-4 times that.
SAVE THIS TACO MEAT RECIPE TO PINTEREST


Chuq
Your recipe scale function does not work. There is a check box next to the olive oil and that's that only one that adjusts.
Instant Pot Eats
I will check it out, thanks for the heads up.
Make this today!
What a fantastic recipe! My husband and I enjoyed it immensely. Delicious!
Kent Genter
I really enjoy this recipe, especially when making two pounds of beef taco meat. The only thing I have to question is after assembling salt, ground coriander seed, ground cumin, paprika, and oregano, there is no mention in this recipe as when to incorporate these spices into the mix. I assumed (you know what that means) to incorporate after stirring and breaking up the clumps of ground beef, and just before adding the water.
After dinner the leftovers get cooled and then divided into one cup servings for the "food Saver vacuum seal" and then when it's time for future tacos warm it up sous vide. All-ways great!
Ann Fabrizio
Sous vide is a great tip. Thanks for the instructions feedback, it's updated now.
Irina
Indeed, with your recipe, I will use the instant pot more often. I made the taco meat today: there is no way to describe the deliciousness!!
Kristen
This was so good! And easy to make, too!
Ann Fabrizio
Thank you! Glad you liked it.
Anjali
I had no idea how easy it was to make taco meat in the instant pot! This was so easy and delicious - will definitely be making it again soon!
Pam
I love a versatile recipe that you can use so many ways like this one.
Jacqueline Meldrum
A great idea and it could be used in so many lunch and dinner dishes.
Janette J.
This looks wonderful, but you call for THREE different types of tomatoes in the recipe & directions -- chopped, passata & crushed: which is it? Now I'm going to guess, based more on the photo than anything else, that you mean passata (often called tomato puree in the US) or "crushed" tomatoes (they're almost but not quite the same), not diced. Or if you use diced you'll also add some tomato paste to get that thicker texture & richness of flavour. Anyway, I'm going to make it with passata because it's what I have on hand & am older than dirt & know what I'm doing, but this lack of specificity can utterly confuse inexperienced cooks.
Instant Pot Eats
You can use either of those three for this recipe and it will work; we just wanted to give our readers the options depending on where they are or what they have in the pantry.